.avif)

Did you know that a simple A/B testing led to a 40.6% increase in conversions for Barack Obama's 2008 presidential campaign? It's fascinating how small changes, like tweaking a headline or a call-to-action button, can have such a significant impact. A/B testing, also known as split testing, is a powerful tool that can help you optimize your Webflow site by comparing two versions of a webpage to see which one performs better.
In this guide, we’ll help you understand everything about A/B testing on Webflow. We’ll cover the A/B testing basics, popular tools you can use, and step-by-step process of setting up tests with VWO and Optibase. We'll also take a look at the future of A/B testing with Webflow, now that they’ve acquired Intellimize.
By the end of this guide, you’ll have everything you need to start A/B testing with your website. Let’s begin!
Understanding A/B Testing
What is A/B Testing?
A/B testing, also known as split testing, is a method where you compare two versions of a webpage to determine which one performs better. By showing different versions (Version A and Version B) to similar visitors at the same time, you can analyze which one yields better results based on specific metrics such as conversion rates, click-through rates, or user engagement.
For example, you might create two different headlines for the same landing page and split the traffic so that half of the visitors see headline A and the other half see headline B. By tracking the actions taken by each group, you can determine which headline is more effective.
Why Should You Do It?
A/B testing is crucial for optimizing your website because it allows you to make data-driven decisions. Here’s how A/B testing can help you:
- Improved Conversion Rates: By testing different versions of your site, you can identify which elements drive more conversions, whether it's signing up for a newsletter, making a purchase, or filling out a contact form.
- Enhanced User Experience: Testing different designs, content, and functionalities helps you understand what resonates with your audience, leading to a more enjoyable user experience.
- Data-Driven Decisions: Rather than relying on guesswork or intuition, A/B testing provides concrete data to support your decisions, reducing the risk of implementing changes that could negatively impact your site.
- Reduced Bounce Rates: By optimizing elements that keep visitors engaged, you can reduce the number of people who leave your site without interacting further.
- Higher ROI: Maximizing the effectiveness of your site’s elements means you get more value out of your existing traffic without the need for additional marketing spend.
Types of A/B Tests
There are 3 major types of A/B tests, and the one you use largely depends on your goals.
- Simple A/B Test: This involves testing two versions of a single element (e.g., headline, button color) to see which one performs better.
- Multivariate Testing: This method tests multiple elements simultaneously to see how different combinations affect the outcome. It's more complex but can provide deeper insights.
- Split URL Testing: This involves creating entirely different URLs for each version of the page. This is useful for major redesigns or testing entirely different layouts.
By understanding and experimenting with these different types of tests, you can more effectively optimize various aspects of your Webflow site to improve performance and conversions.
Essential Tools for A/B Testing
There are many great tools out there for A/B testing like Crazy Egg, Optimizely, Convert etc. But we prefer VWO and Optibase and we’ll tell you why.
VWO (Visual Website Optimizer)
VWO is a really powerful A/B testing platform that makes it easy to test and optimize your website. Here’s why we like VWO:
- Visual Editor: VWO offers a drag-and-drop visual editor, allowing you to create and modify test variations without any coding skills.
- Multivariate Testing: Besides simple A/B tests, VWO supports multivariate testing, so you can test multiple elements simultaneously.
- Heatmaps and Session Recordings: They provide visual insights into user behavior, helping you understand how visitors interact with your site.
- Targeting and Segmentation: You can segment your audience and target specific groups based on various criteria, ensuring your tests reach the right people.
- Analytics Integration: VWO integrates well with your exisiting analytics tools like Google Analytics, making it easy to get accurate data of your tests.
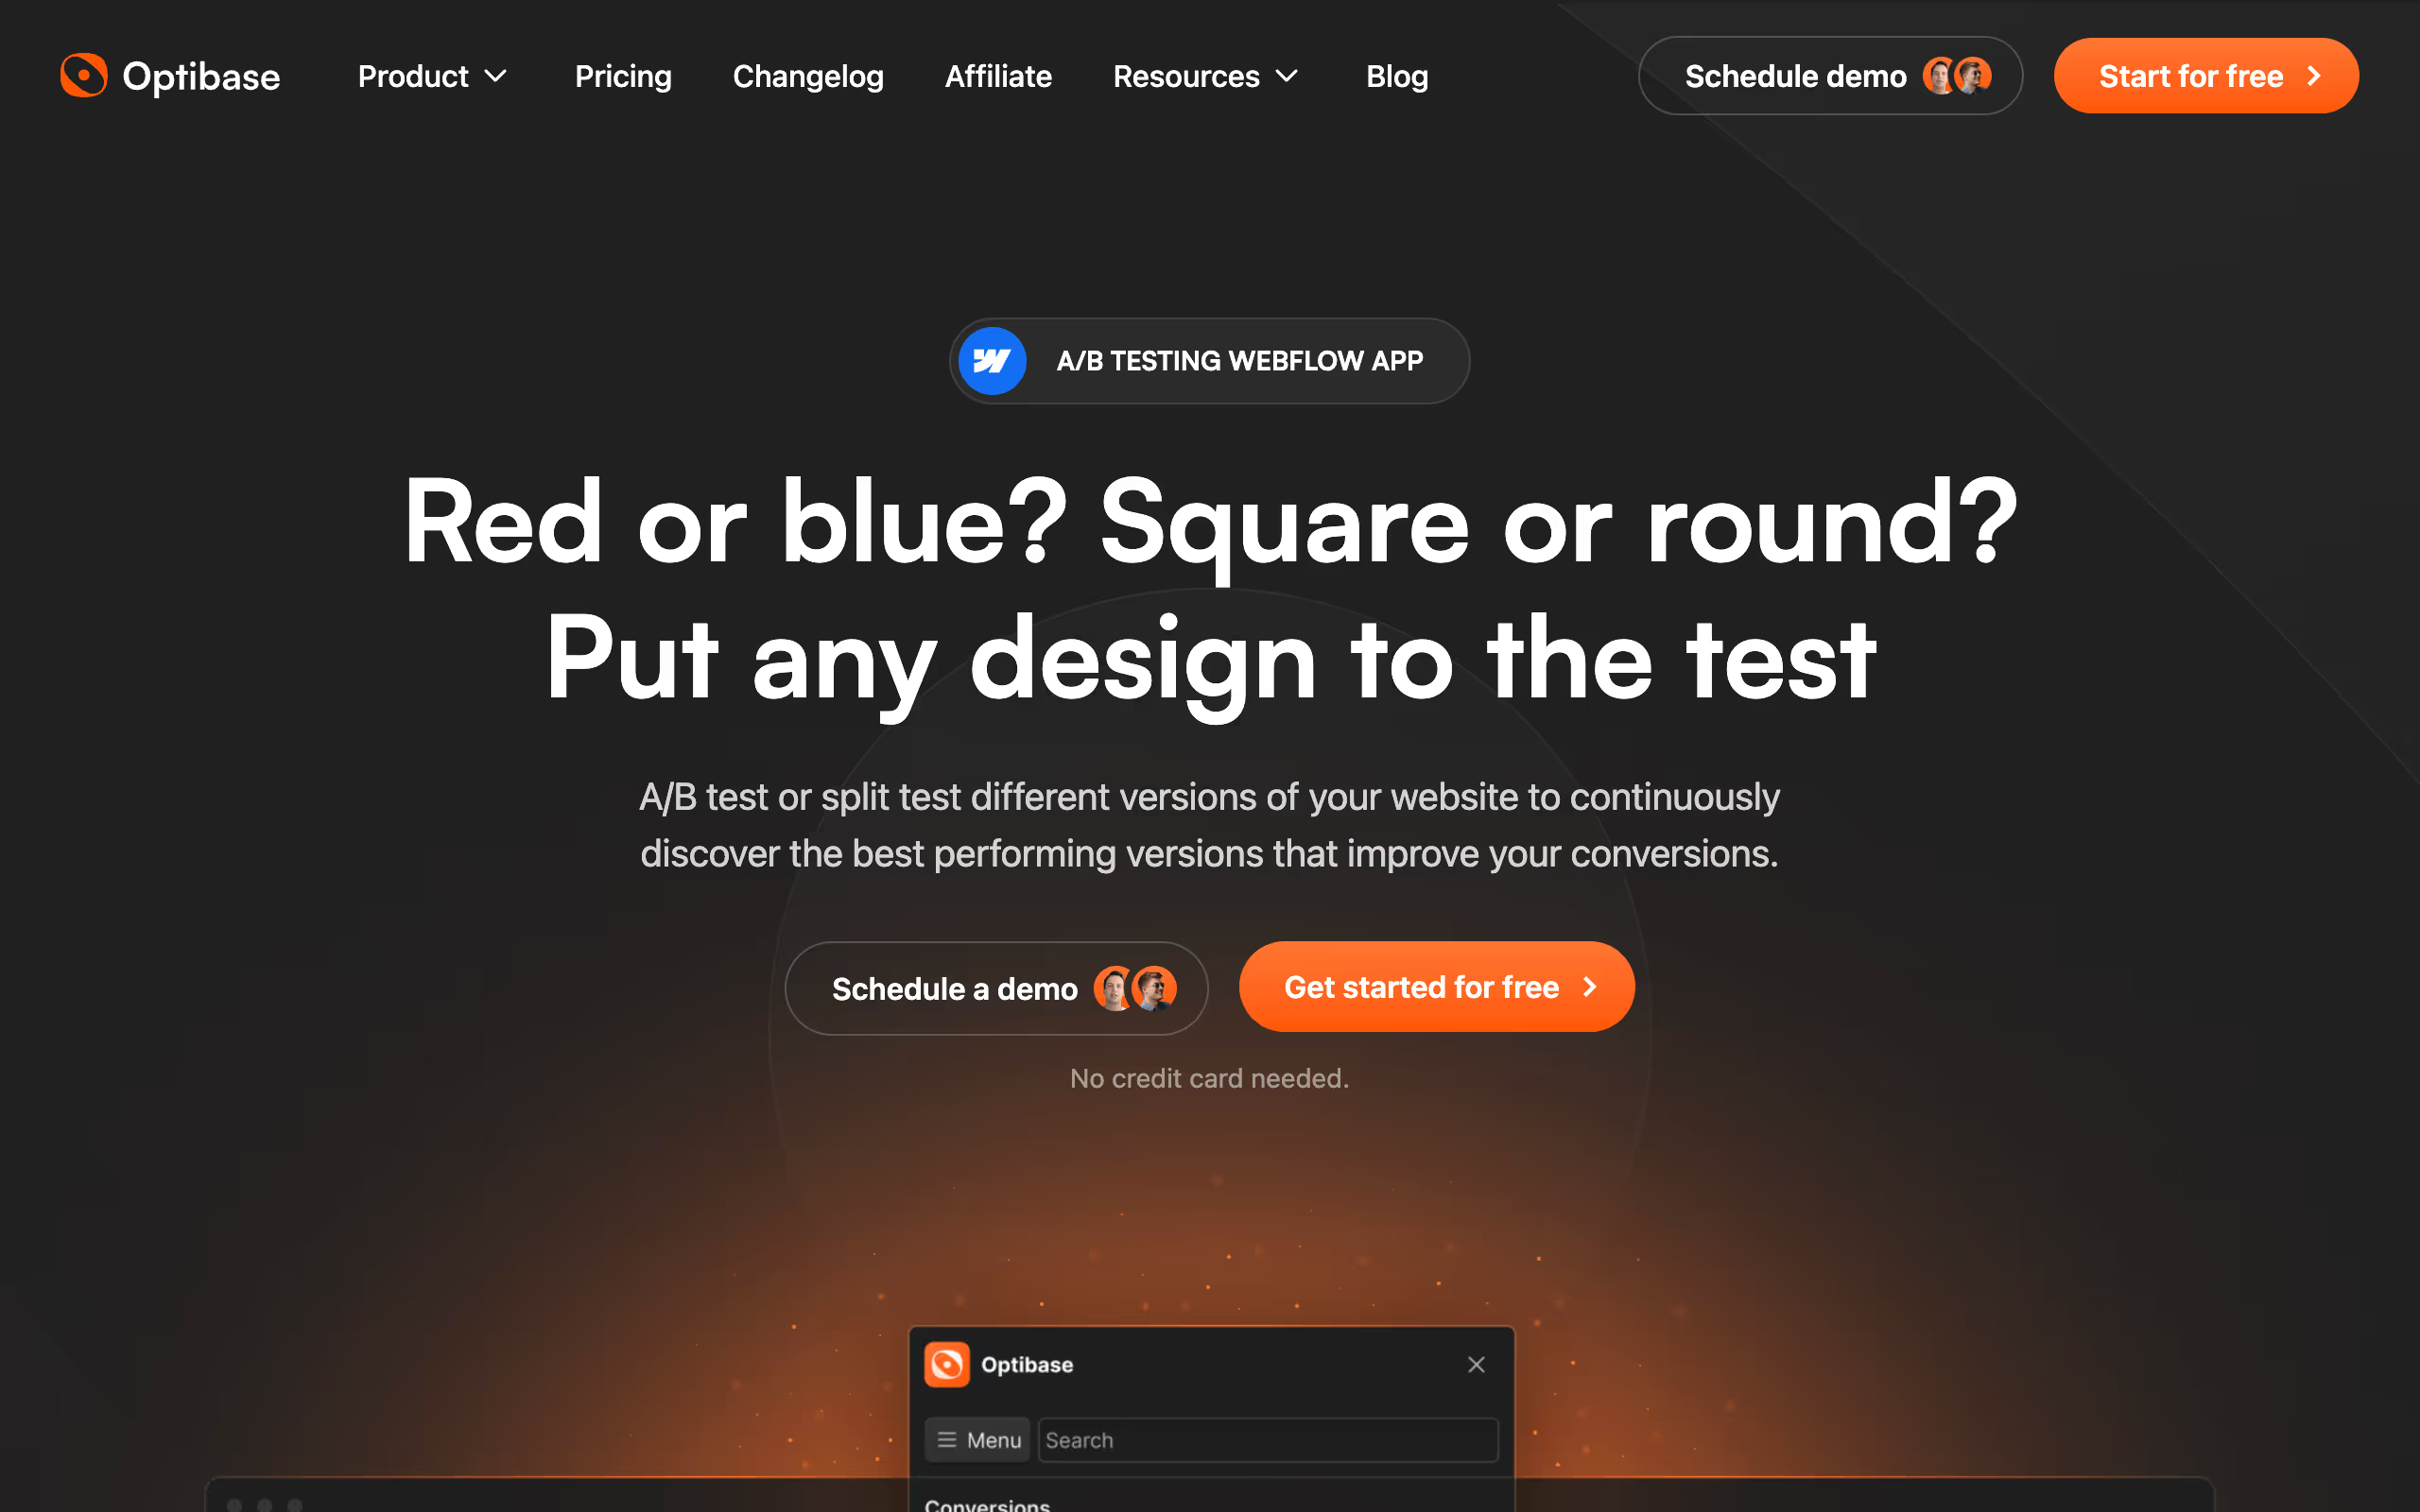
Optibase
Optibase is another excellent tool for A/B testing, designed to make the testing process simple yet powerful. Here’s why we like Optibase:
- Ease of Use: Optibase provides a straightforward setup process and an intuitive interface, making it accessible for users of all skill levels.
- Detailed Reports: It generates detailed reports that gives deep insights into the performance of each variation, including metrics like conversion rates, bounce rates, and engagement levels.
- Integration with Webflow: Optibase has a webflow app that allows you to smoothly integrate it with Webflow, so you can implement and manage tests directly within your Webflow projects.
- Real-Time Results: You can monitor your tests in real-time, enabling you to make quick adjustments and optimize your website continuously.
Now that you understand which tools could help you most in your A/B tests, let’s see how you can implement your first A/B test with each of these tools.
Step-by-Step Guide to A/B Testing (with VWO)
Let's take an example to make this easy to understand. Suppose you want to test two versions of the hero headline on your Webflow site to see which one performs better. Here’s how you can set up a test using VWO:
Step 1: Sign Up and Create an Account
- Visit the VWO Website: Sign up on the VWO website or login if you already have an account.
2. Create a New Project: Once logged in, create a new project for your Webflow site. Enter your website URL and name your project accordingly.
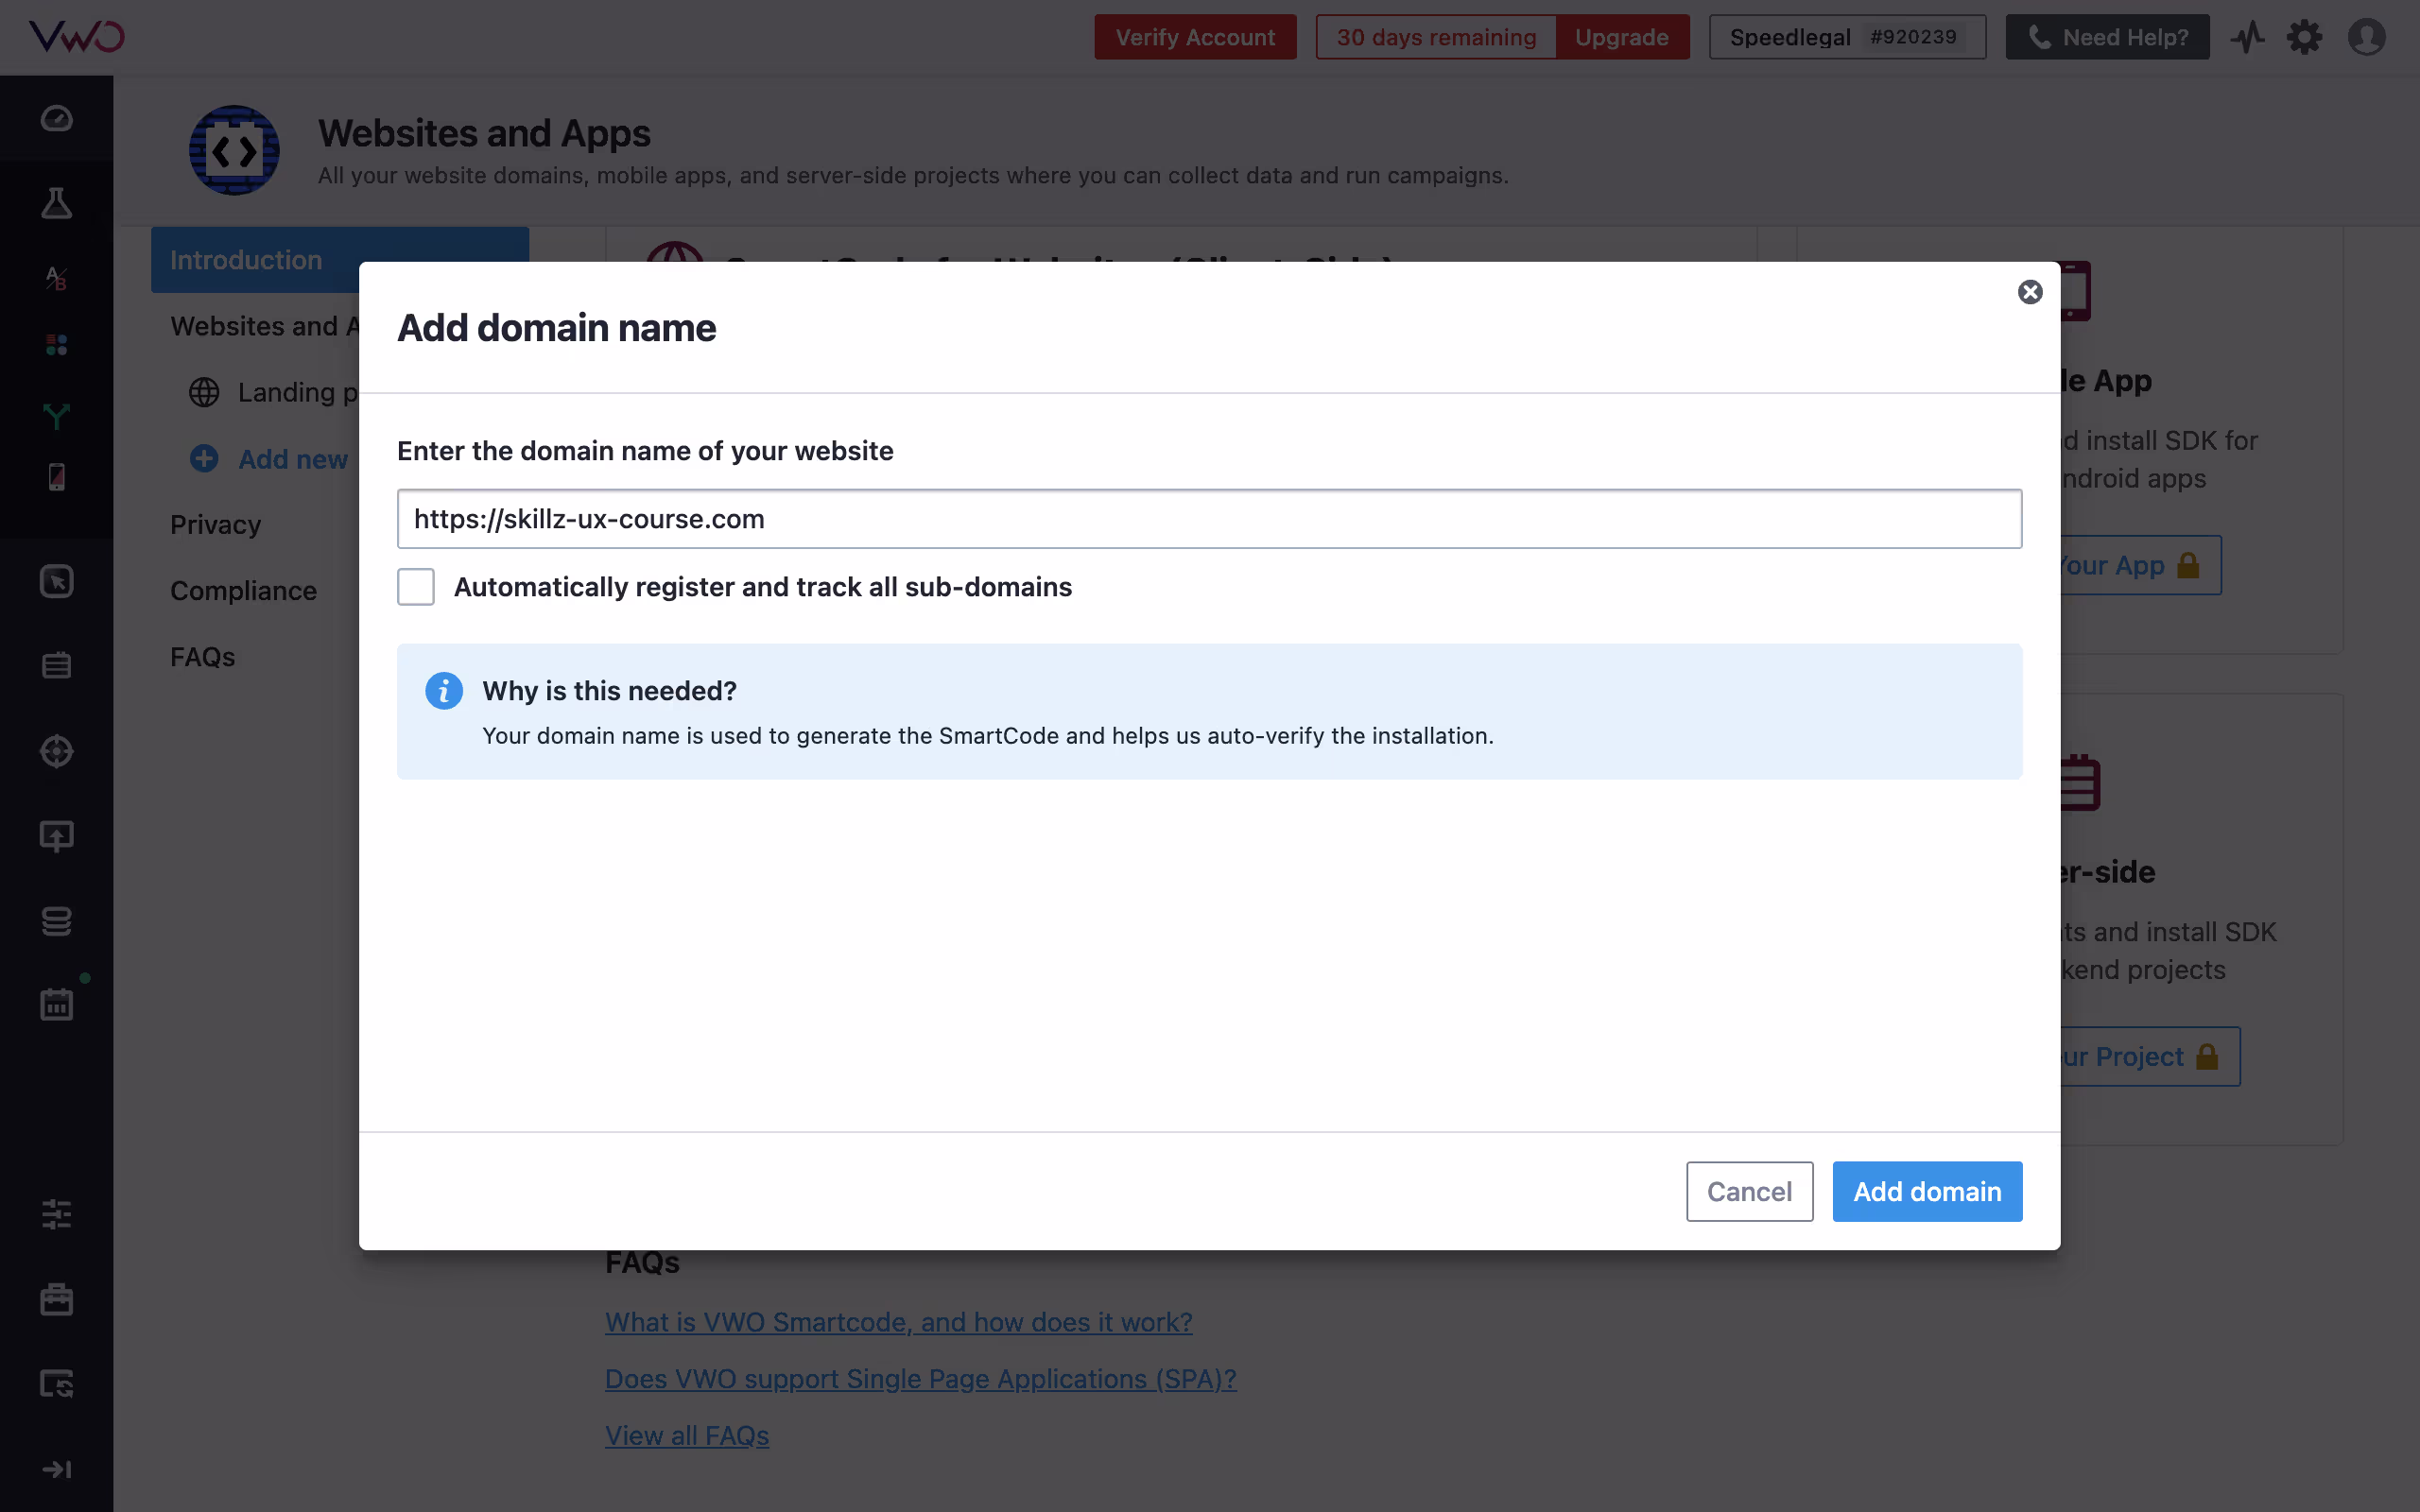
Step 2: Install VWO on Your Webflow Site
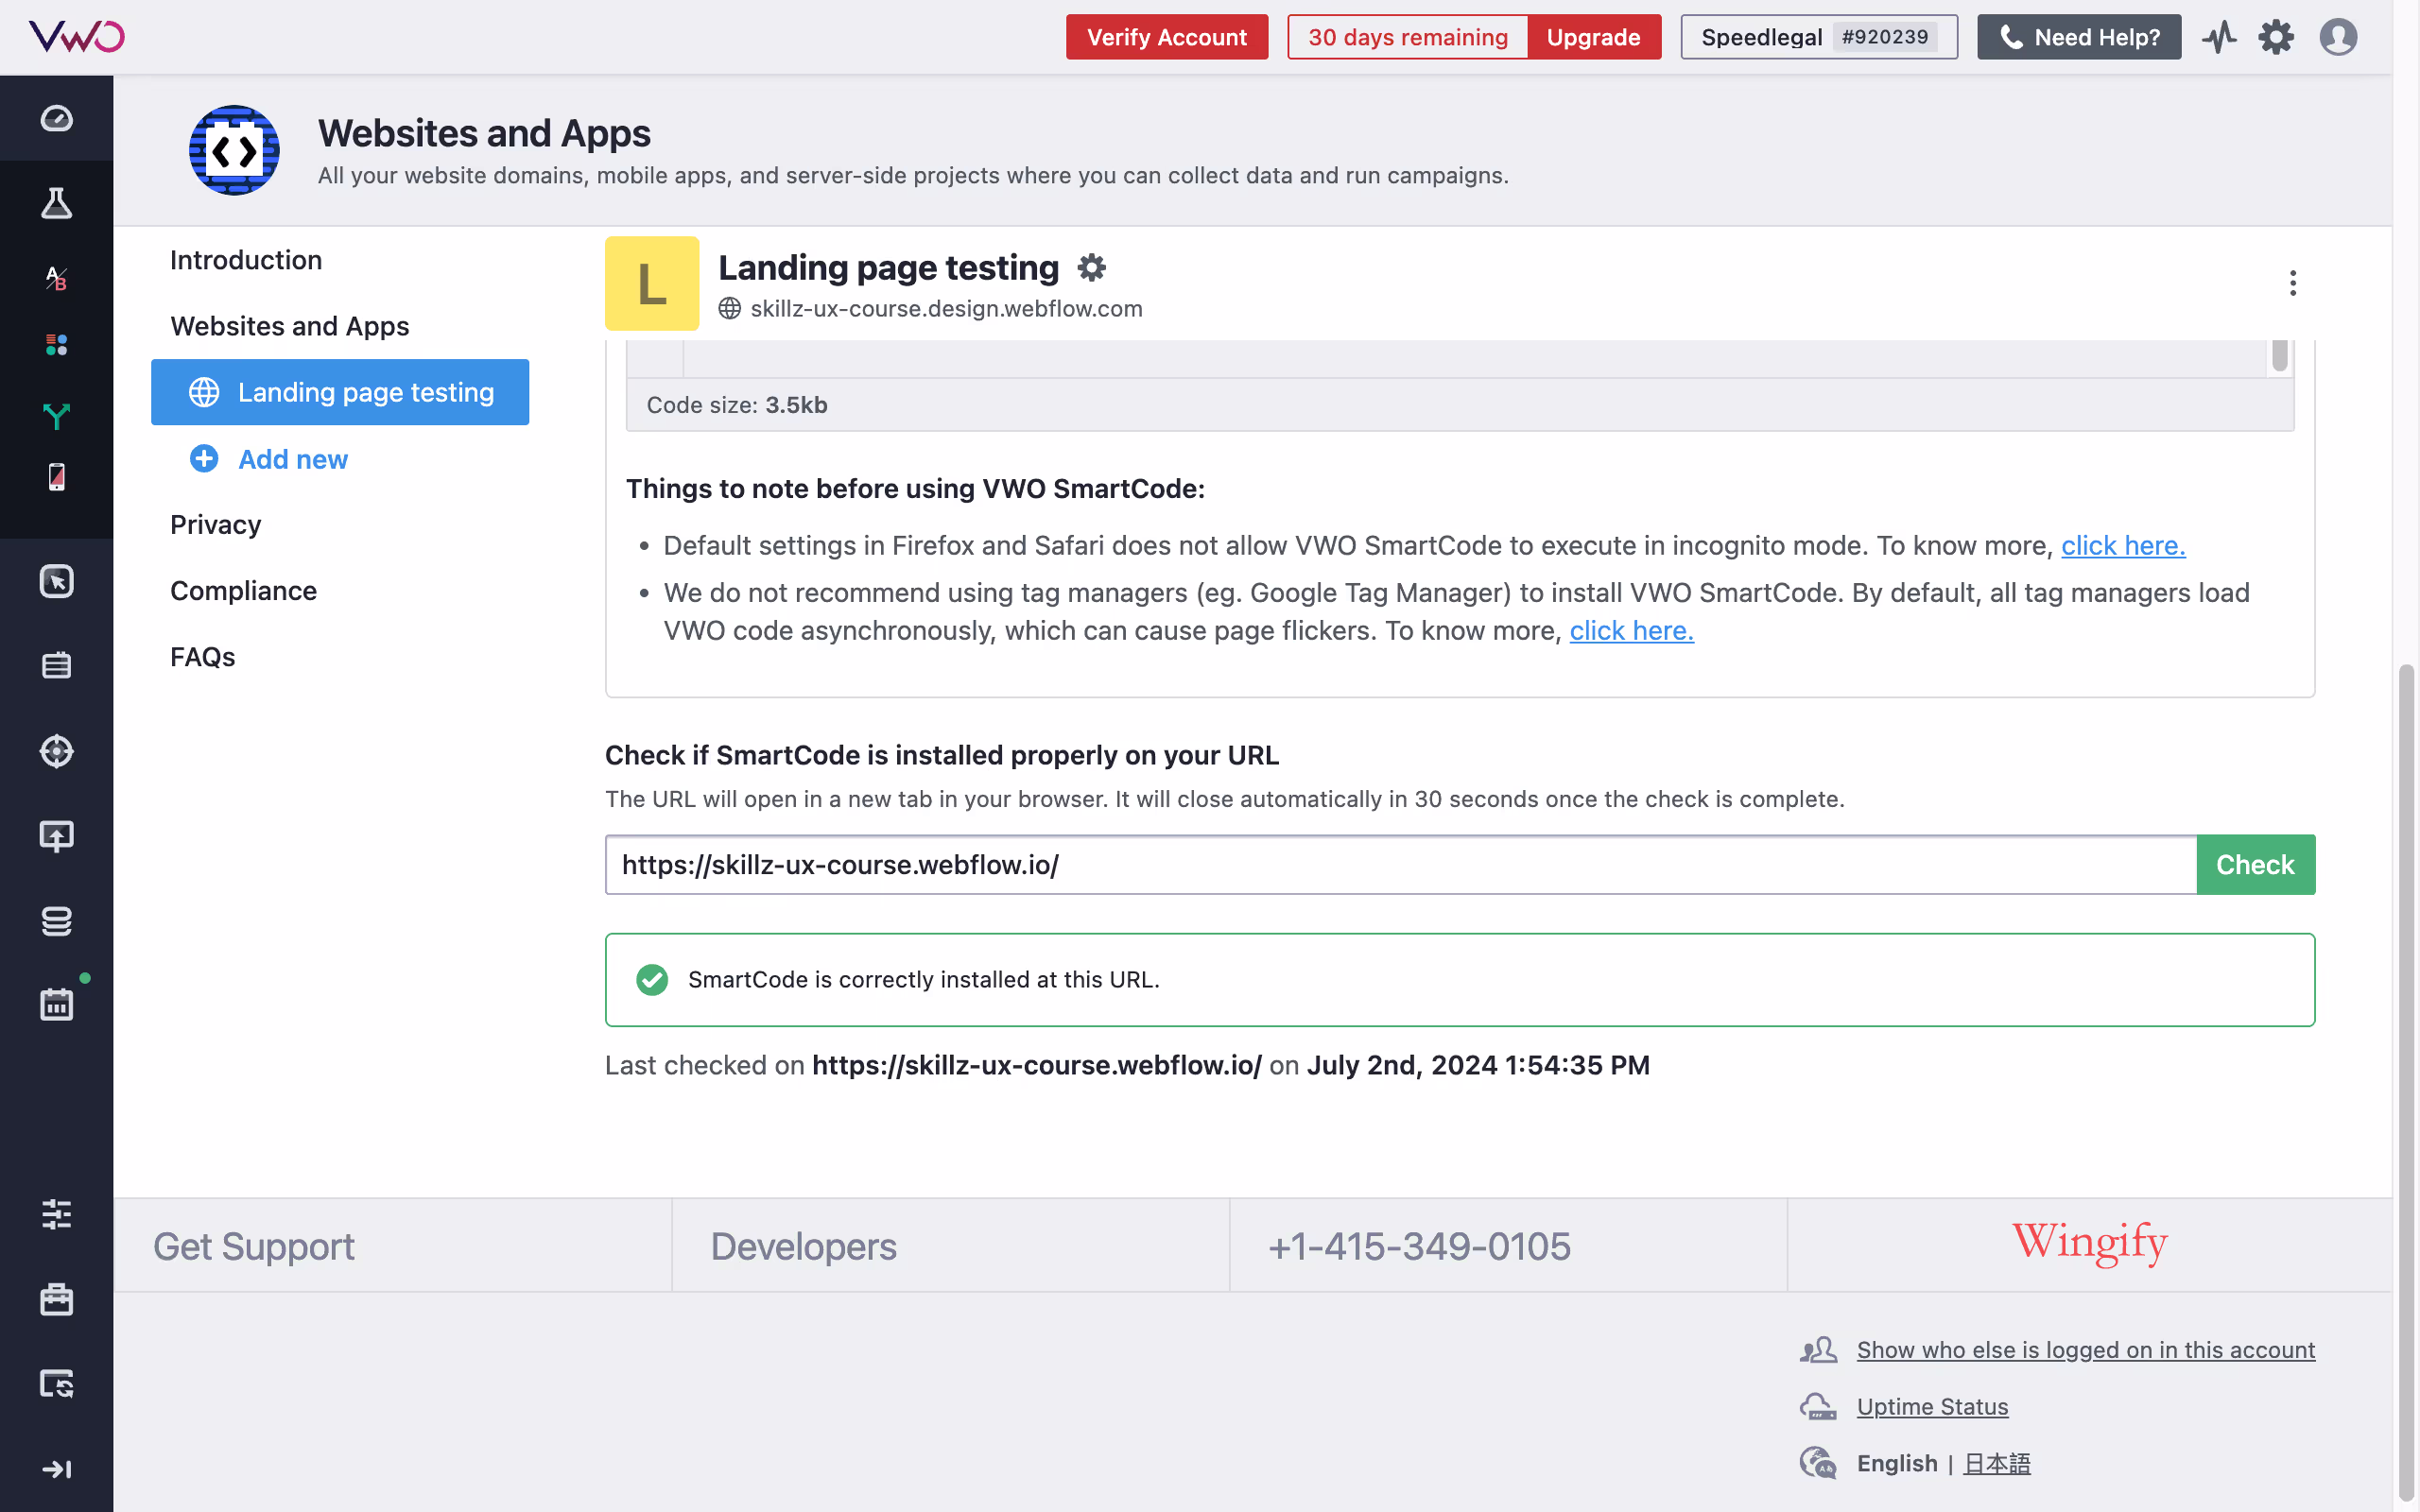
1. Get the Tracking Code: Once you add your website, you’ll land on a dashboard where you’ll see the smart code generated for your website. Copy the code.
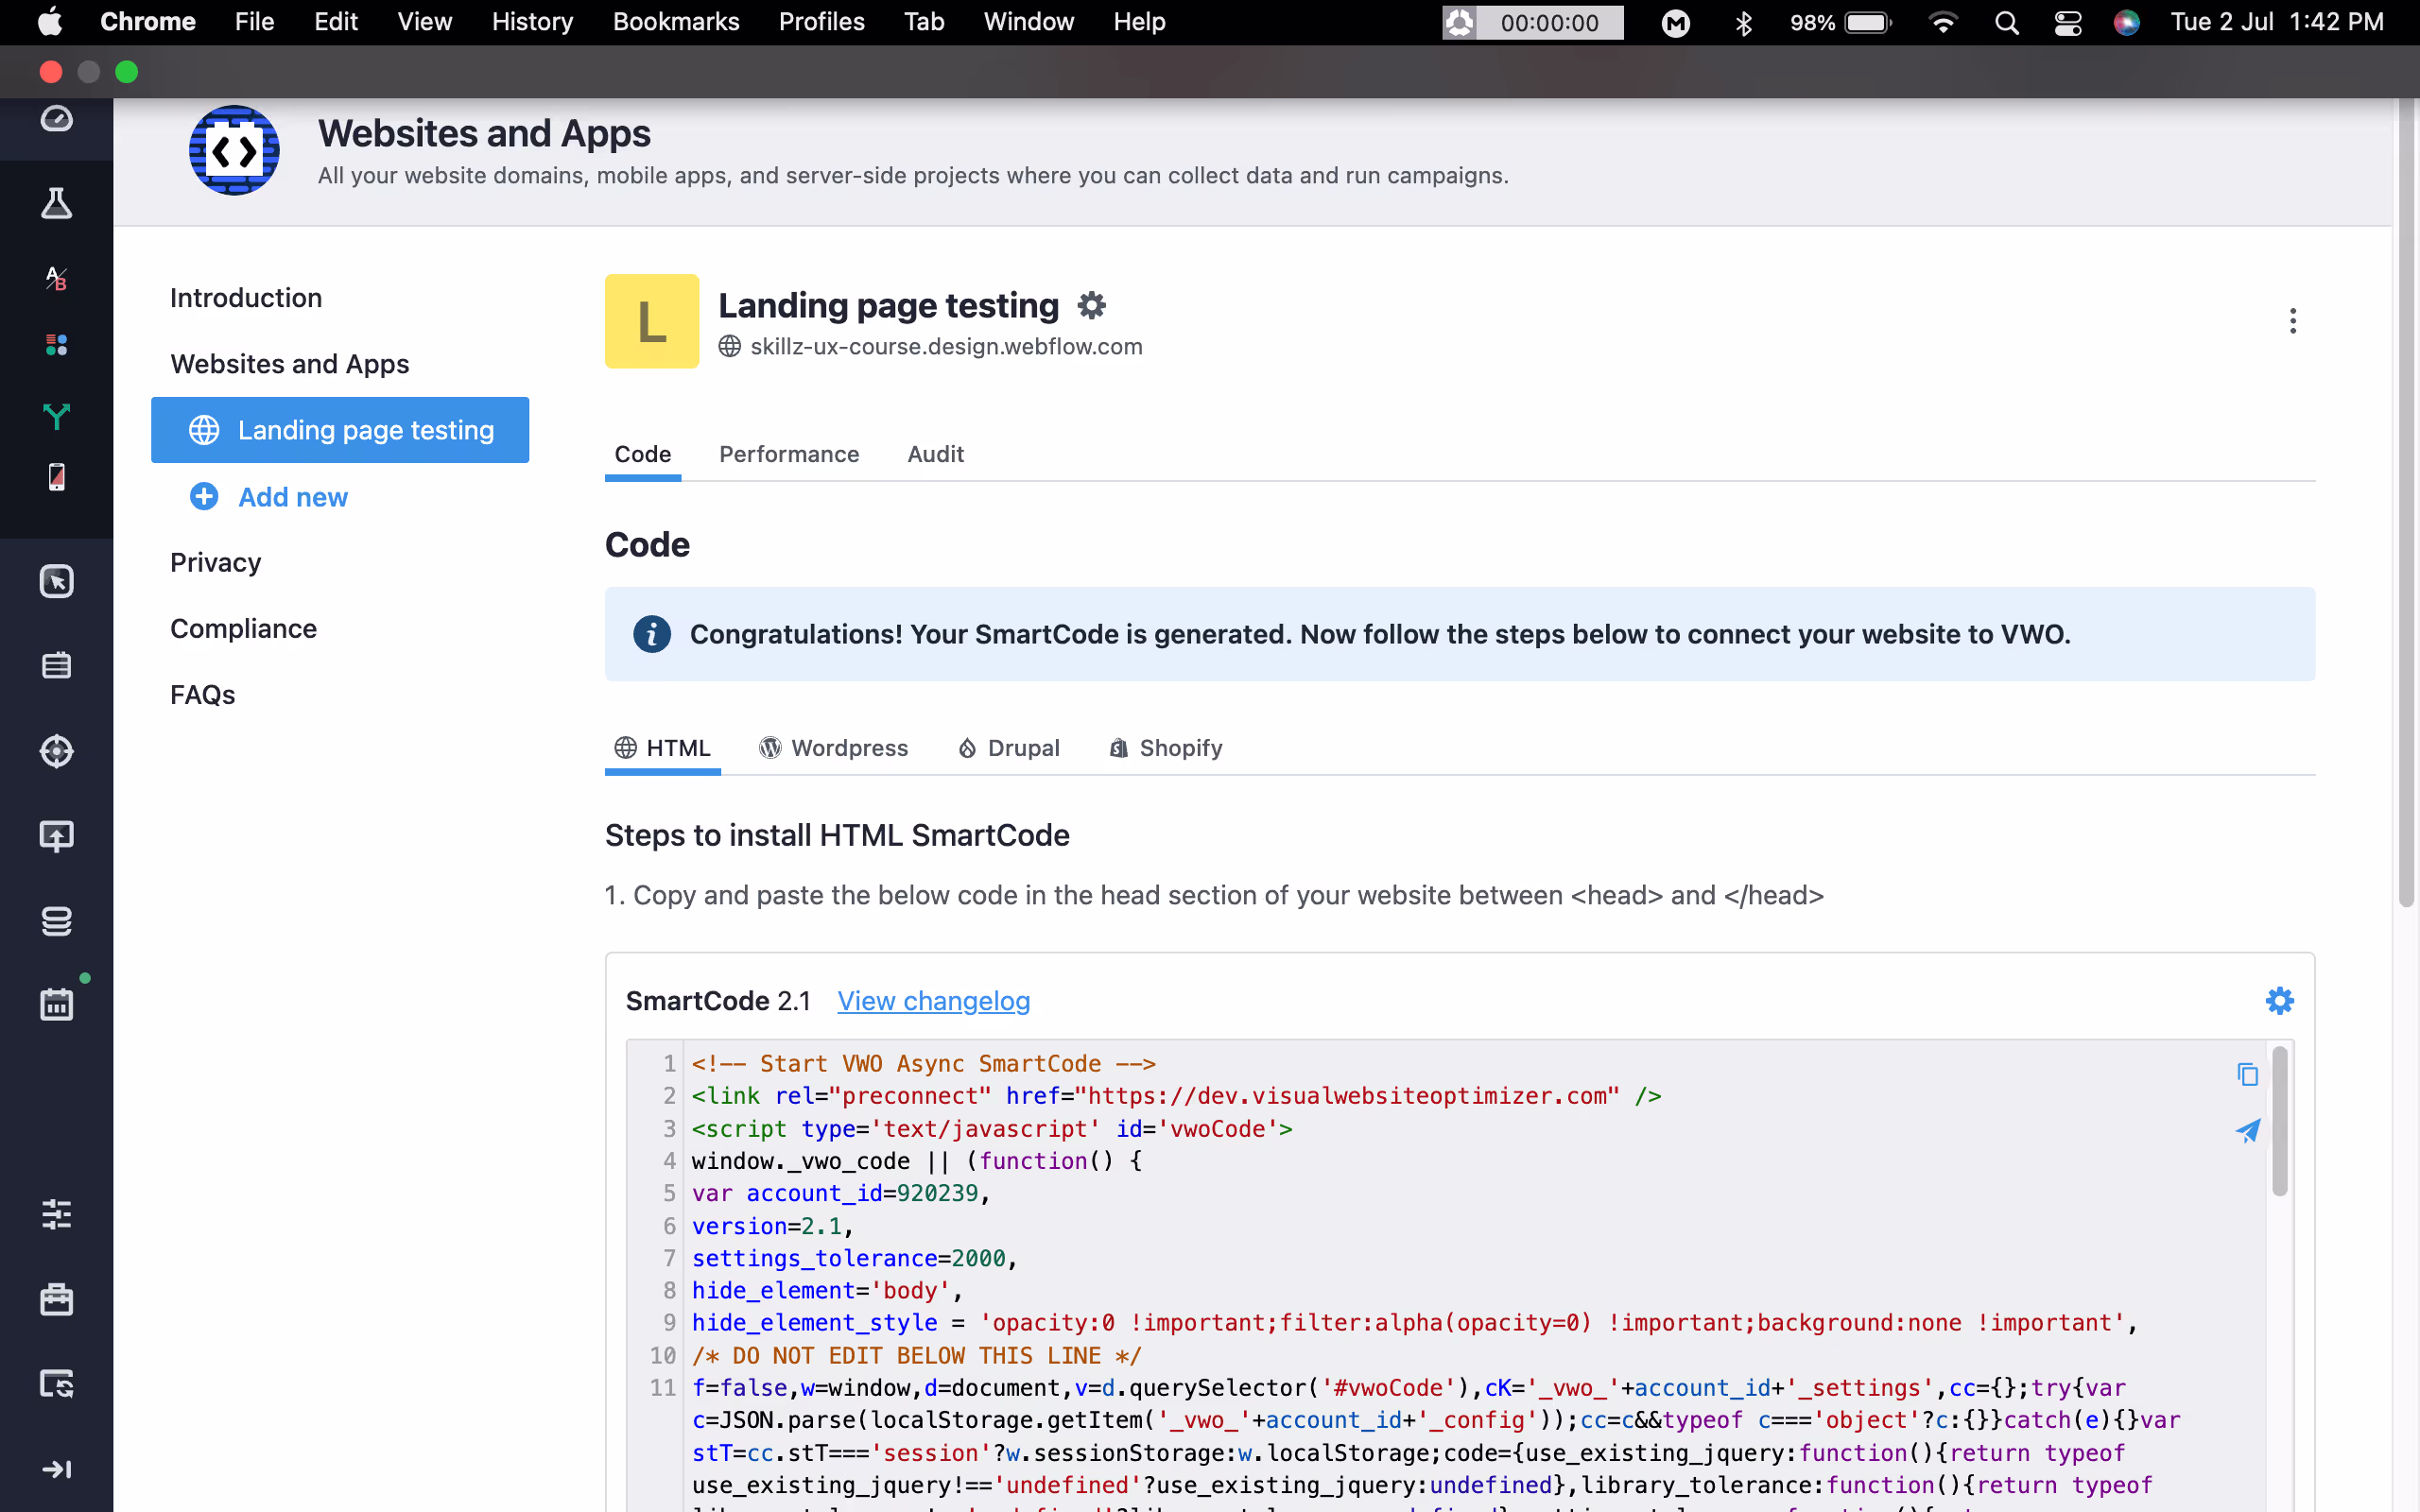
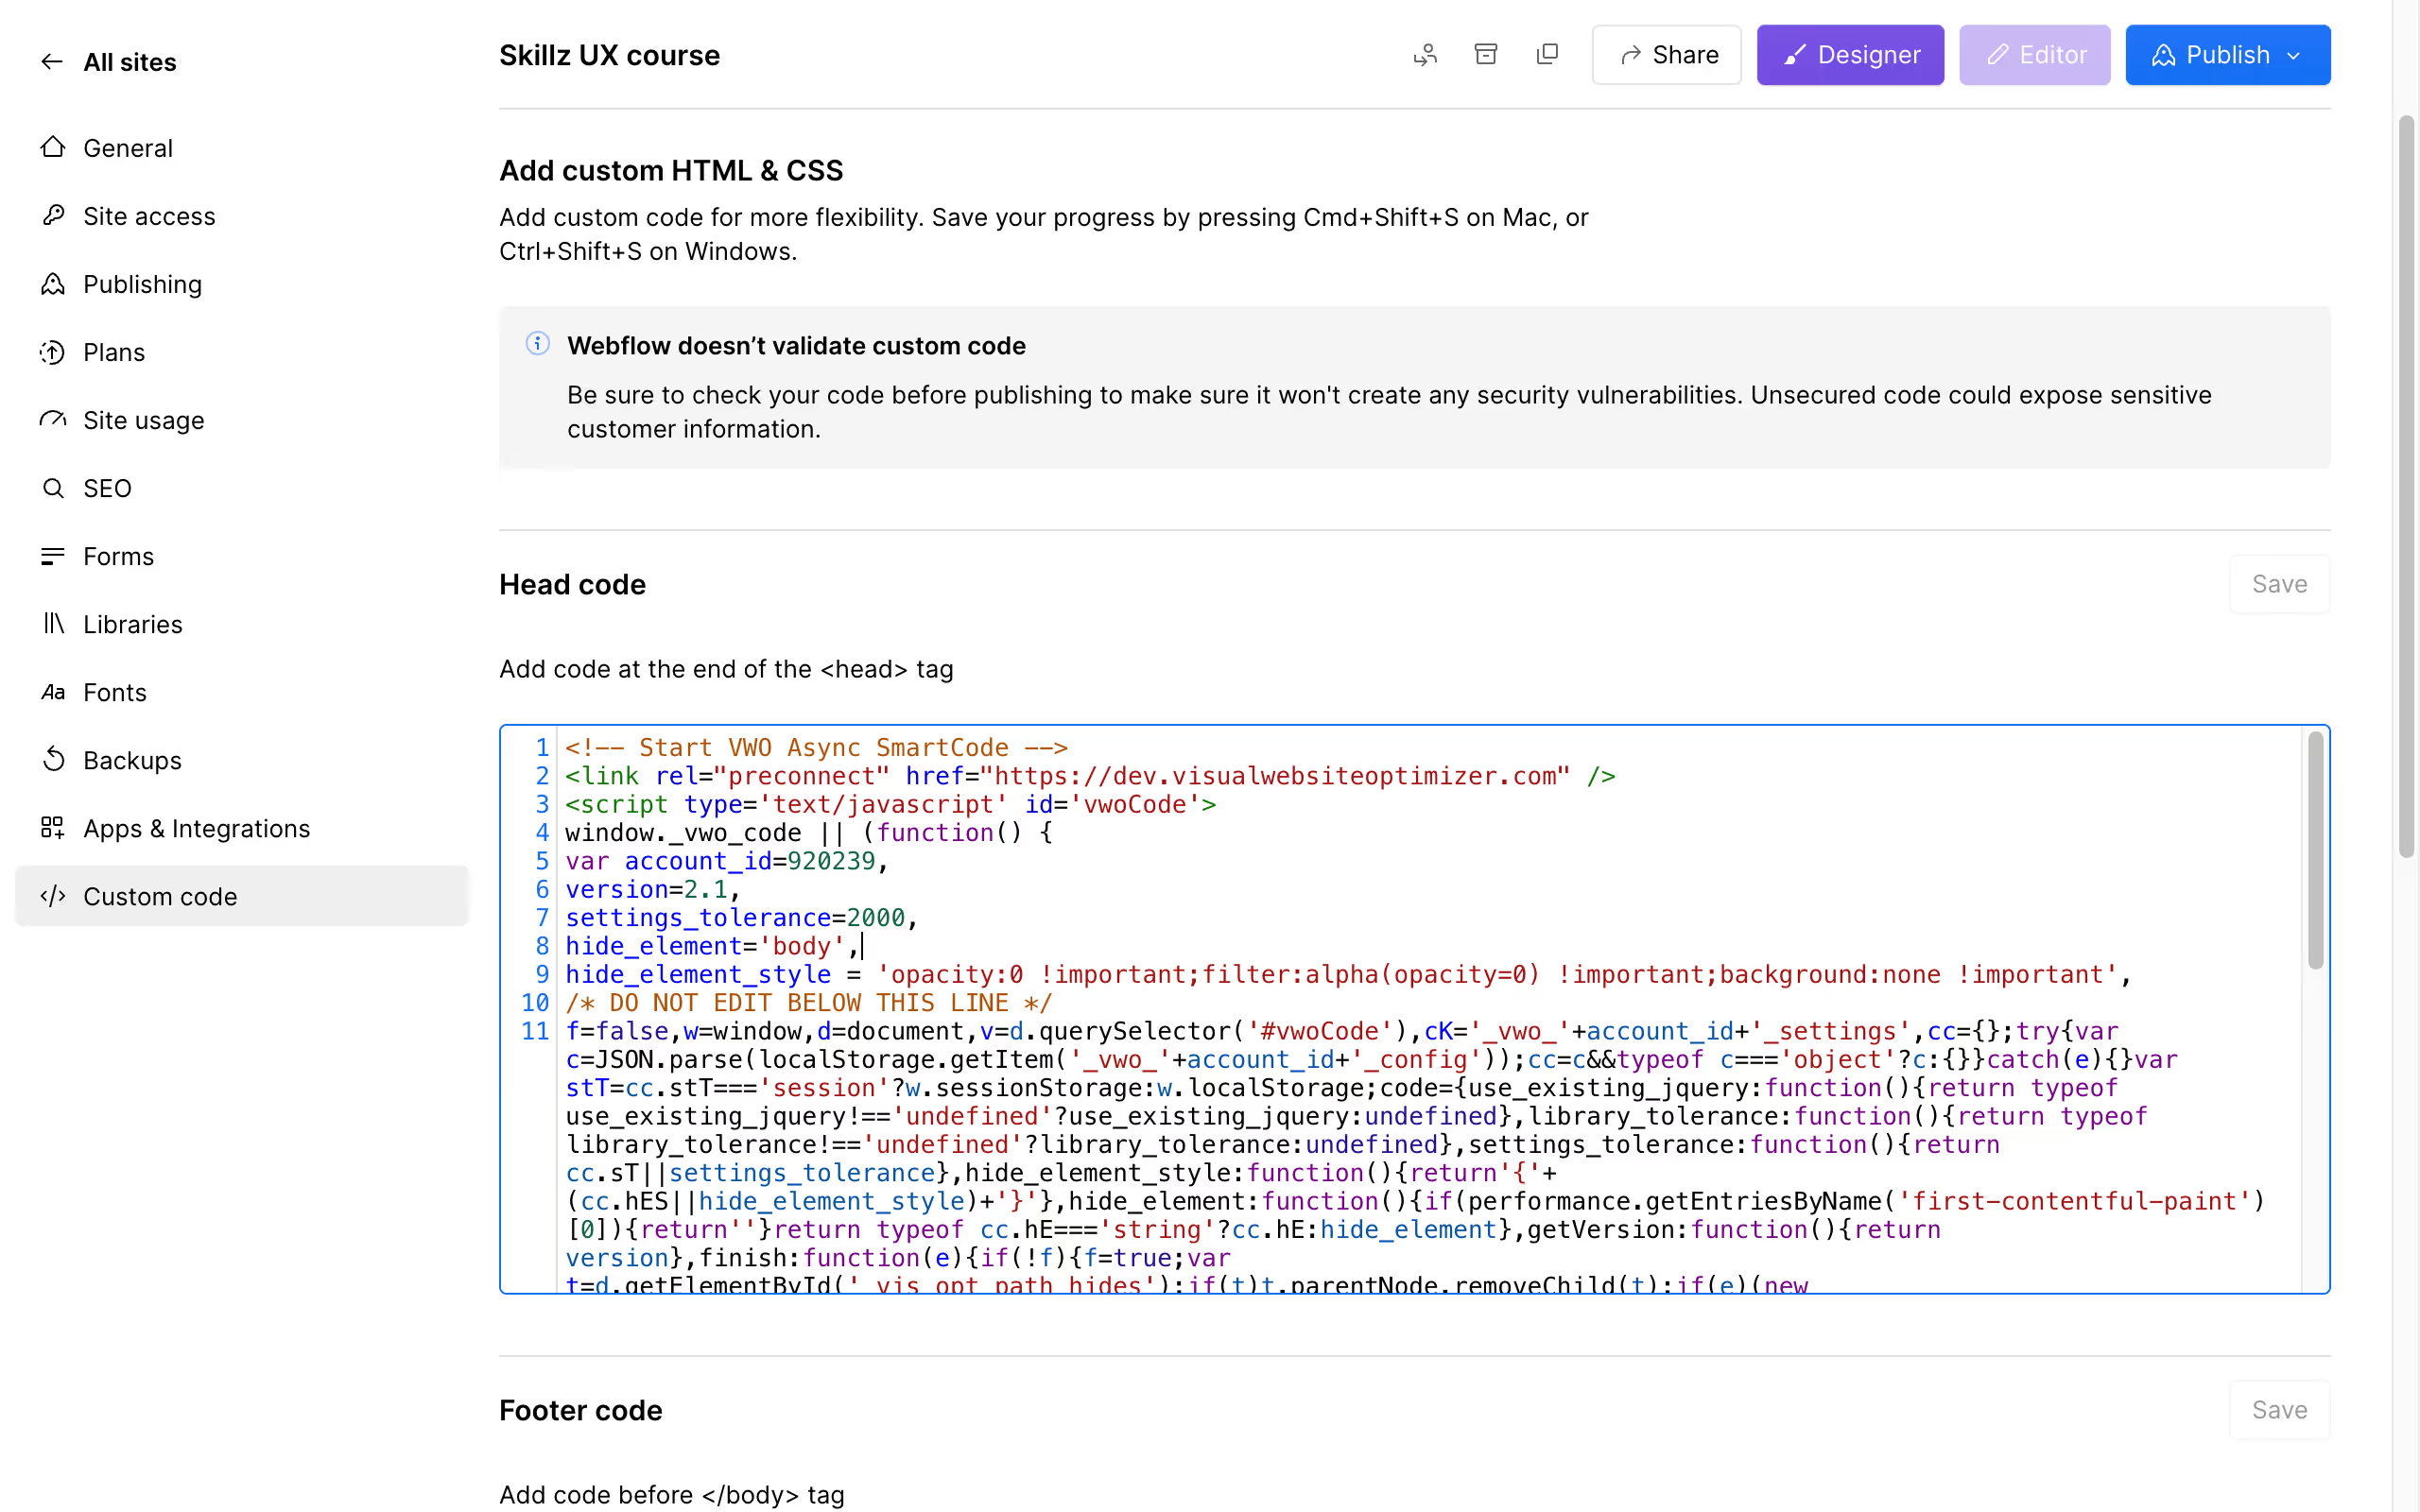
2. Add Tracking Code to Webflow:
- Go to your Webflow dashboard.
- Navigate to Project Settings > Custom Code.
- Paste the VWO tracking code snippet into the Head Code section.
- Save changes and publish your site.
3. Test the integration: See if your code is properly implemented by adding the url at the test area and running the check.
Step 3: Create a New A/B Test
Now that VWO is connected with Webflow, we’ll move on to creating your first test.
1. Start a New Test: In your VWO dashboard, click on 'Create' and select 'A/B Test' from the list of test types.
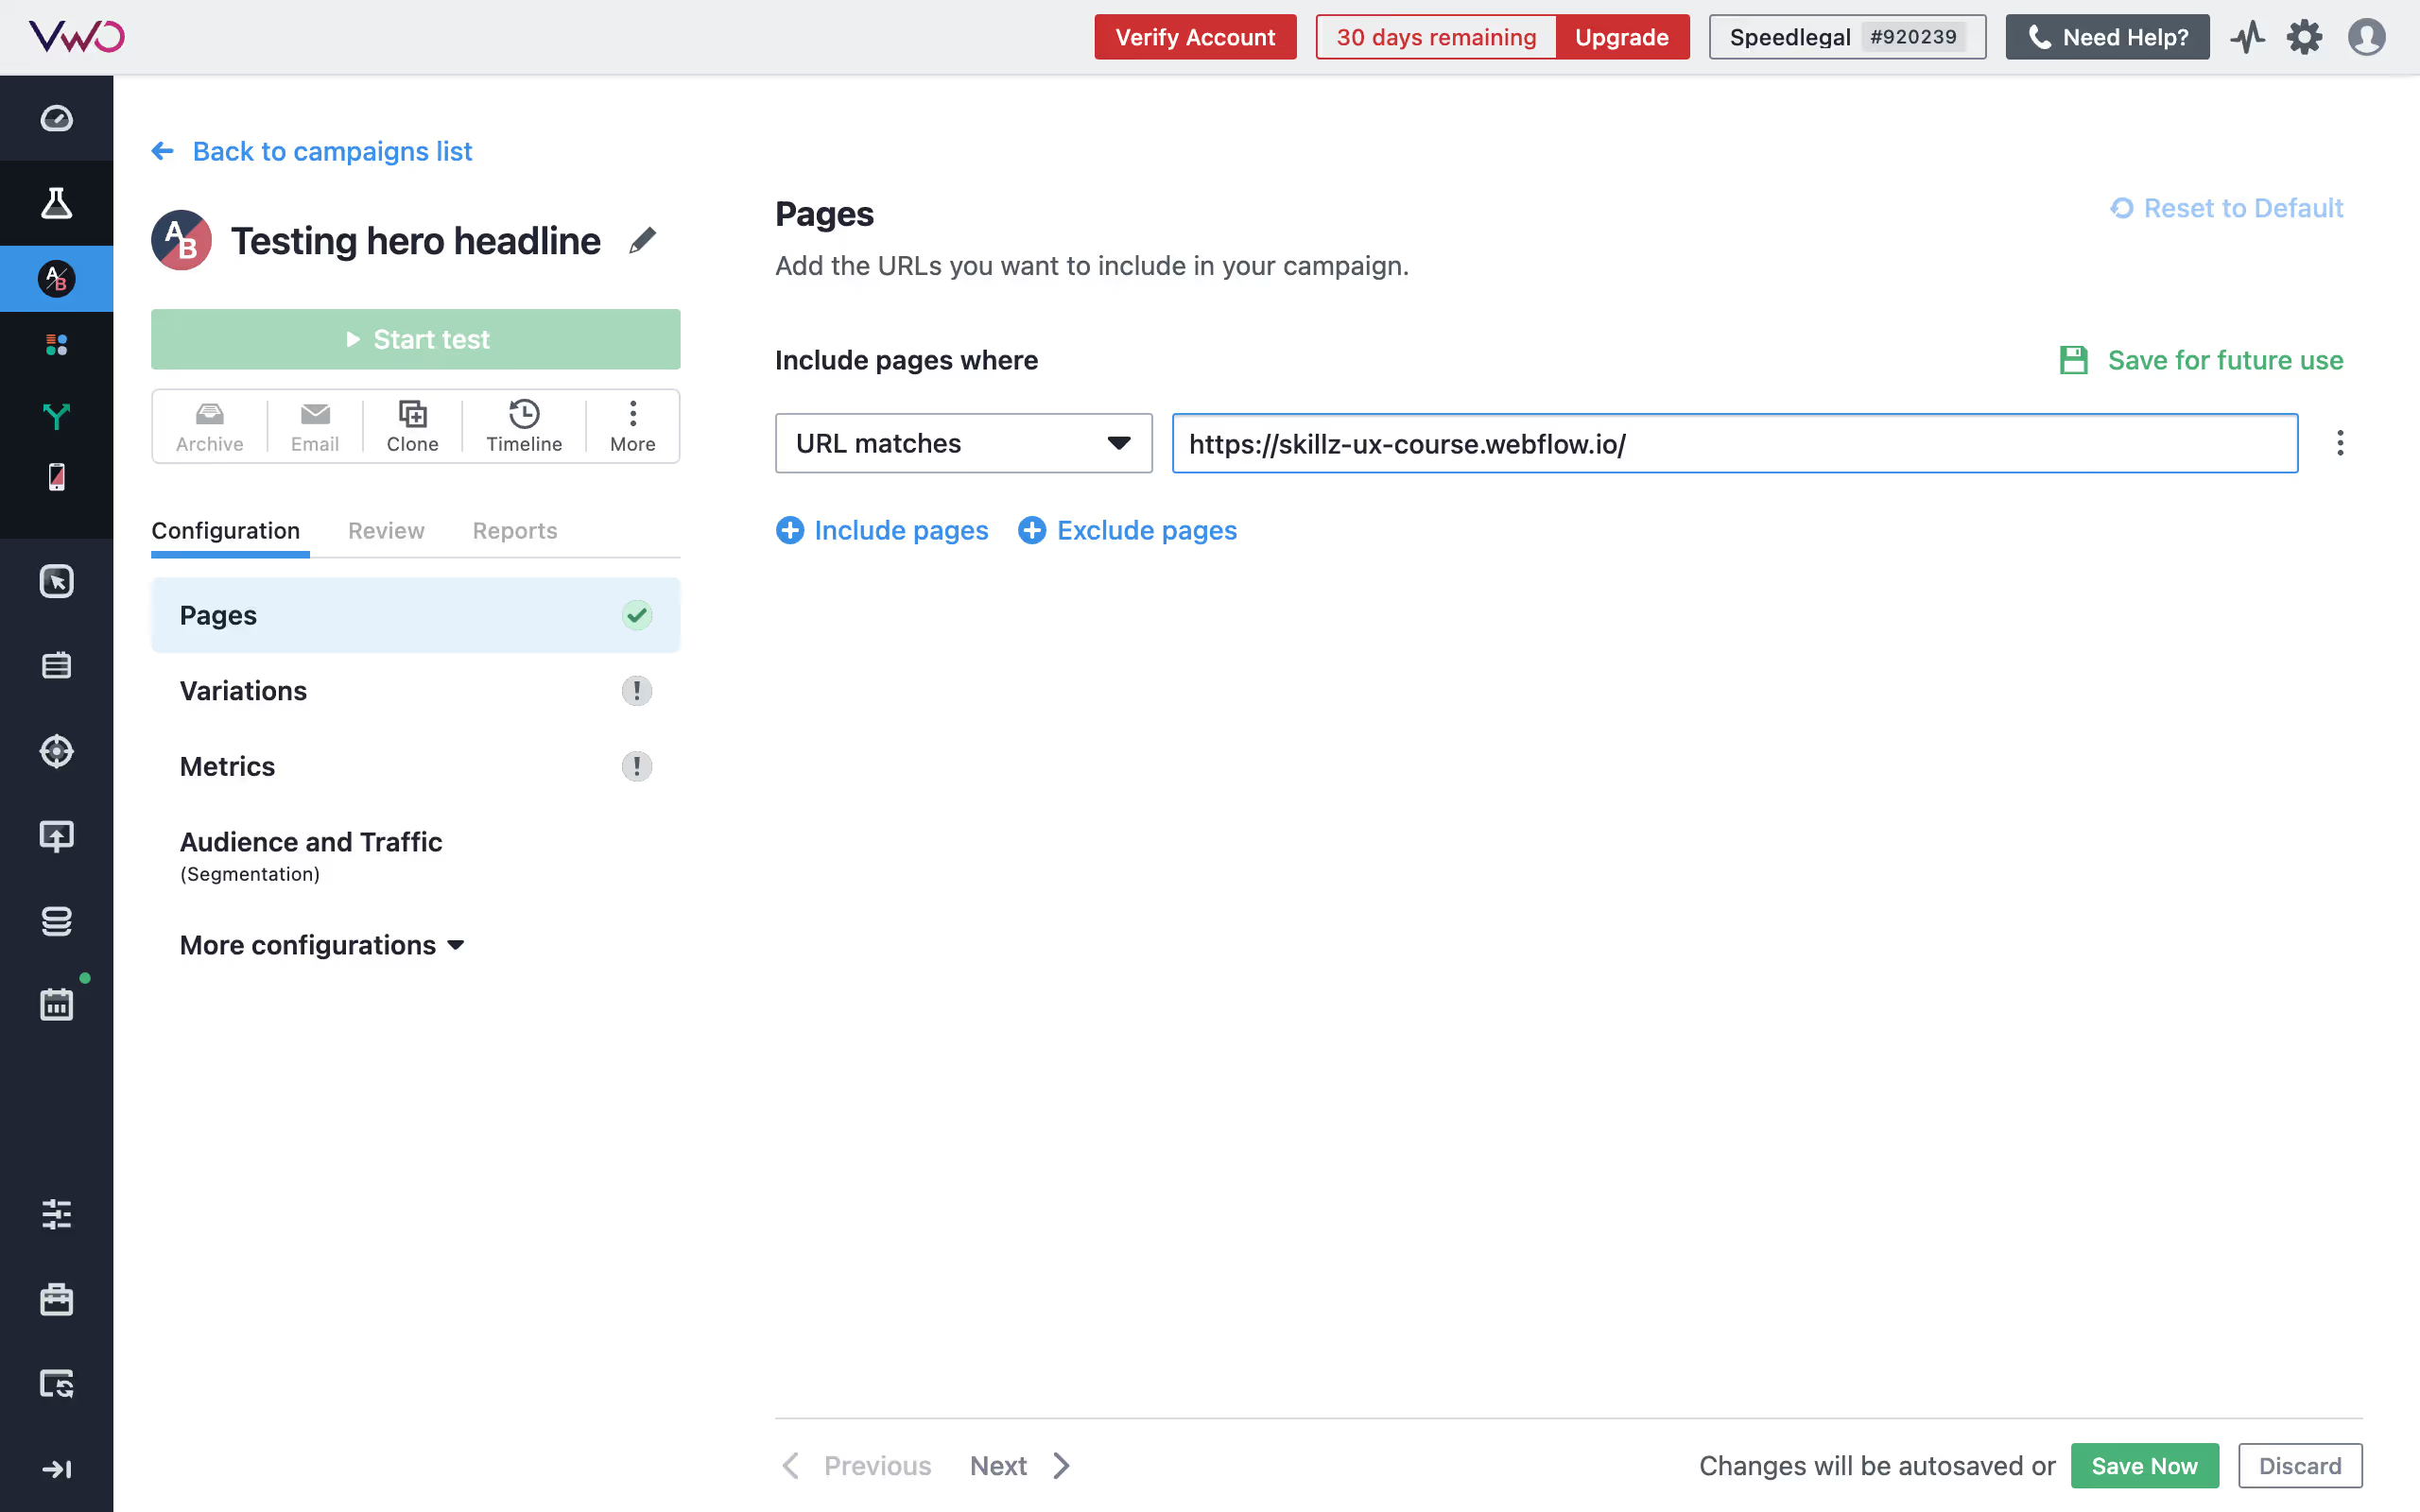
2. Define the Test URL: Enter the URL of the page where you want to test the hero headline. This will be your original version (Control version).
Step 4: Design Your Variations
Next, we’ll add the variation of your landing page with a different heading.
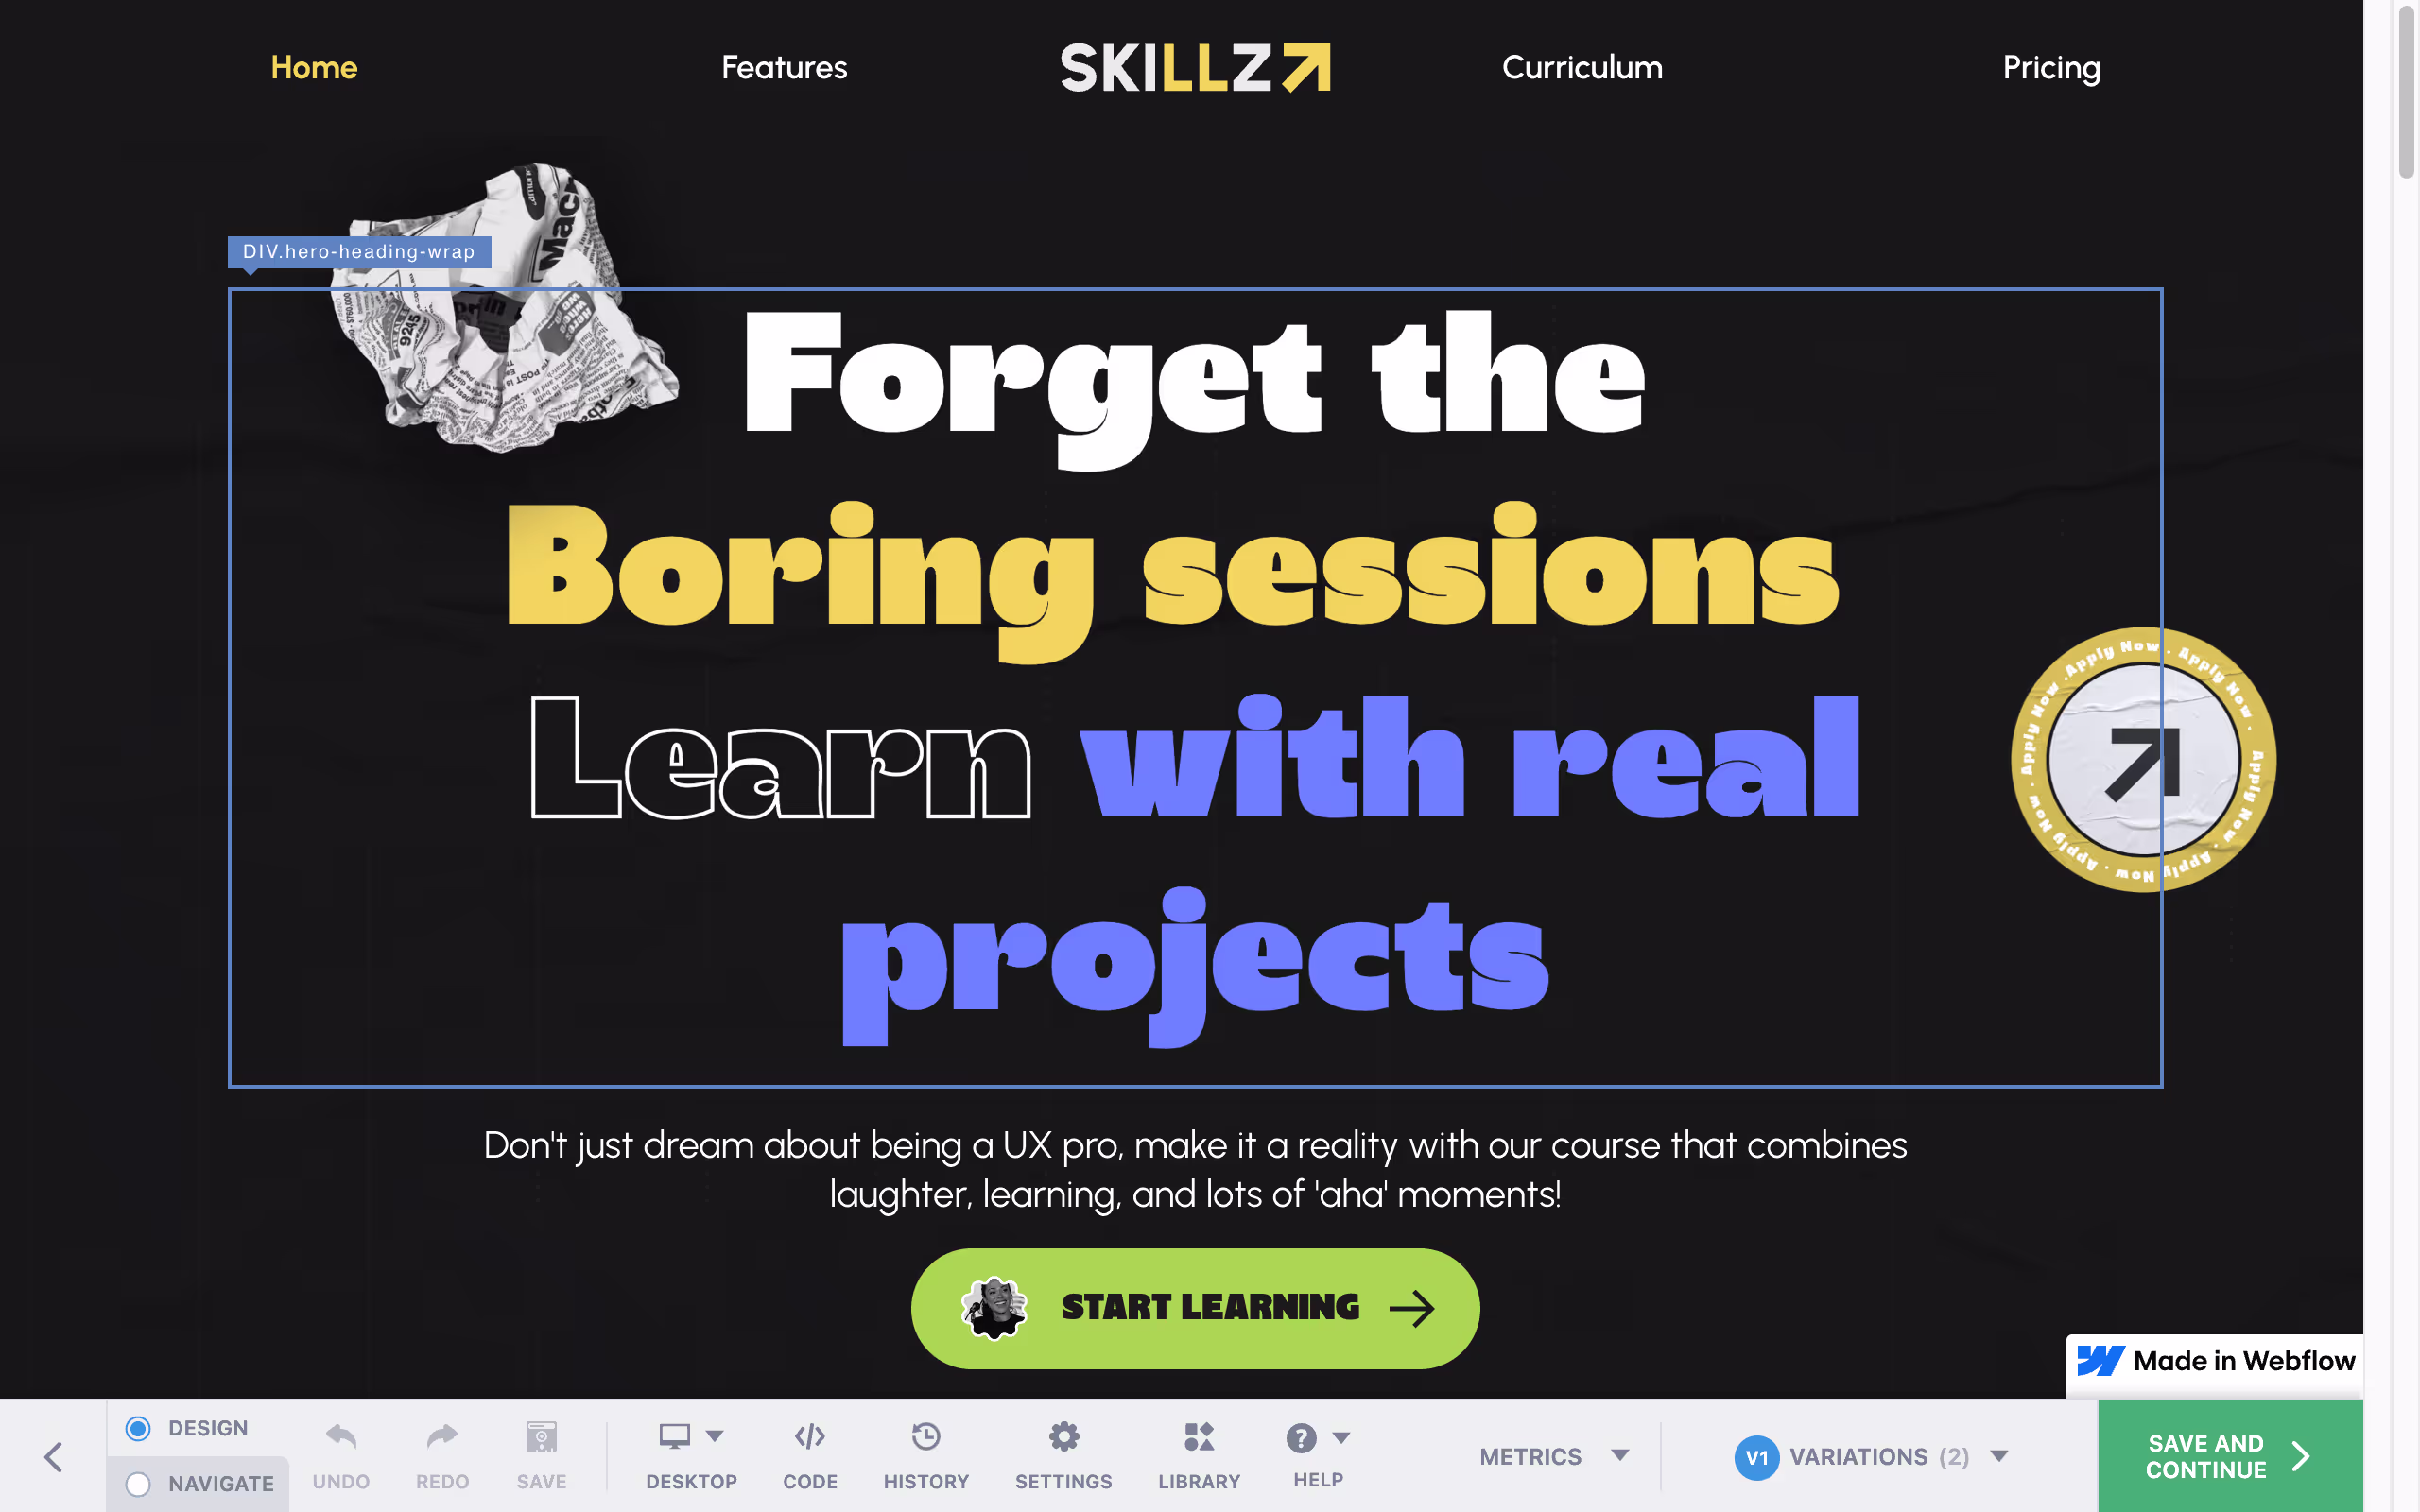
1. Add a variation: Now, go to variations under configurations, and click on ‘add variation’
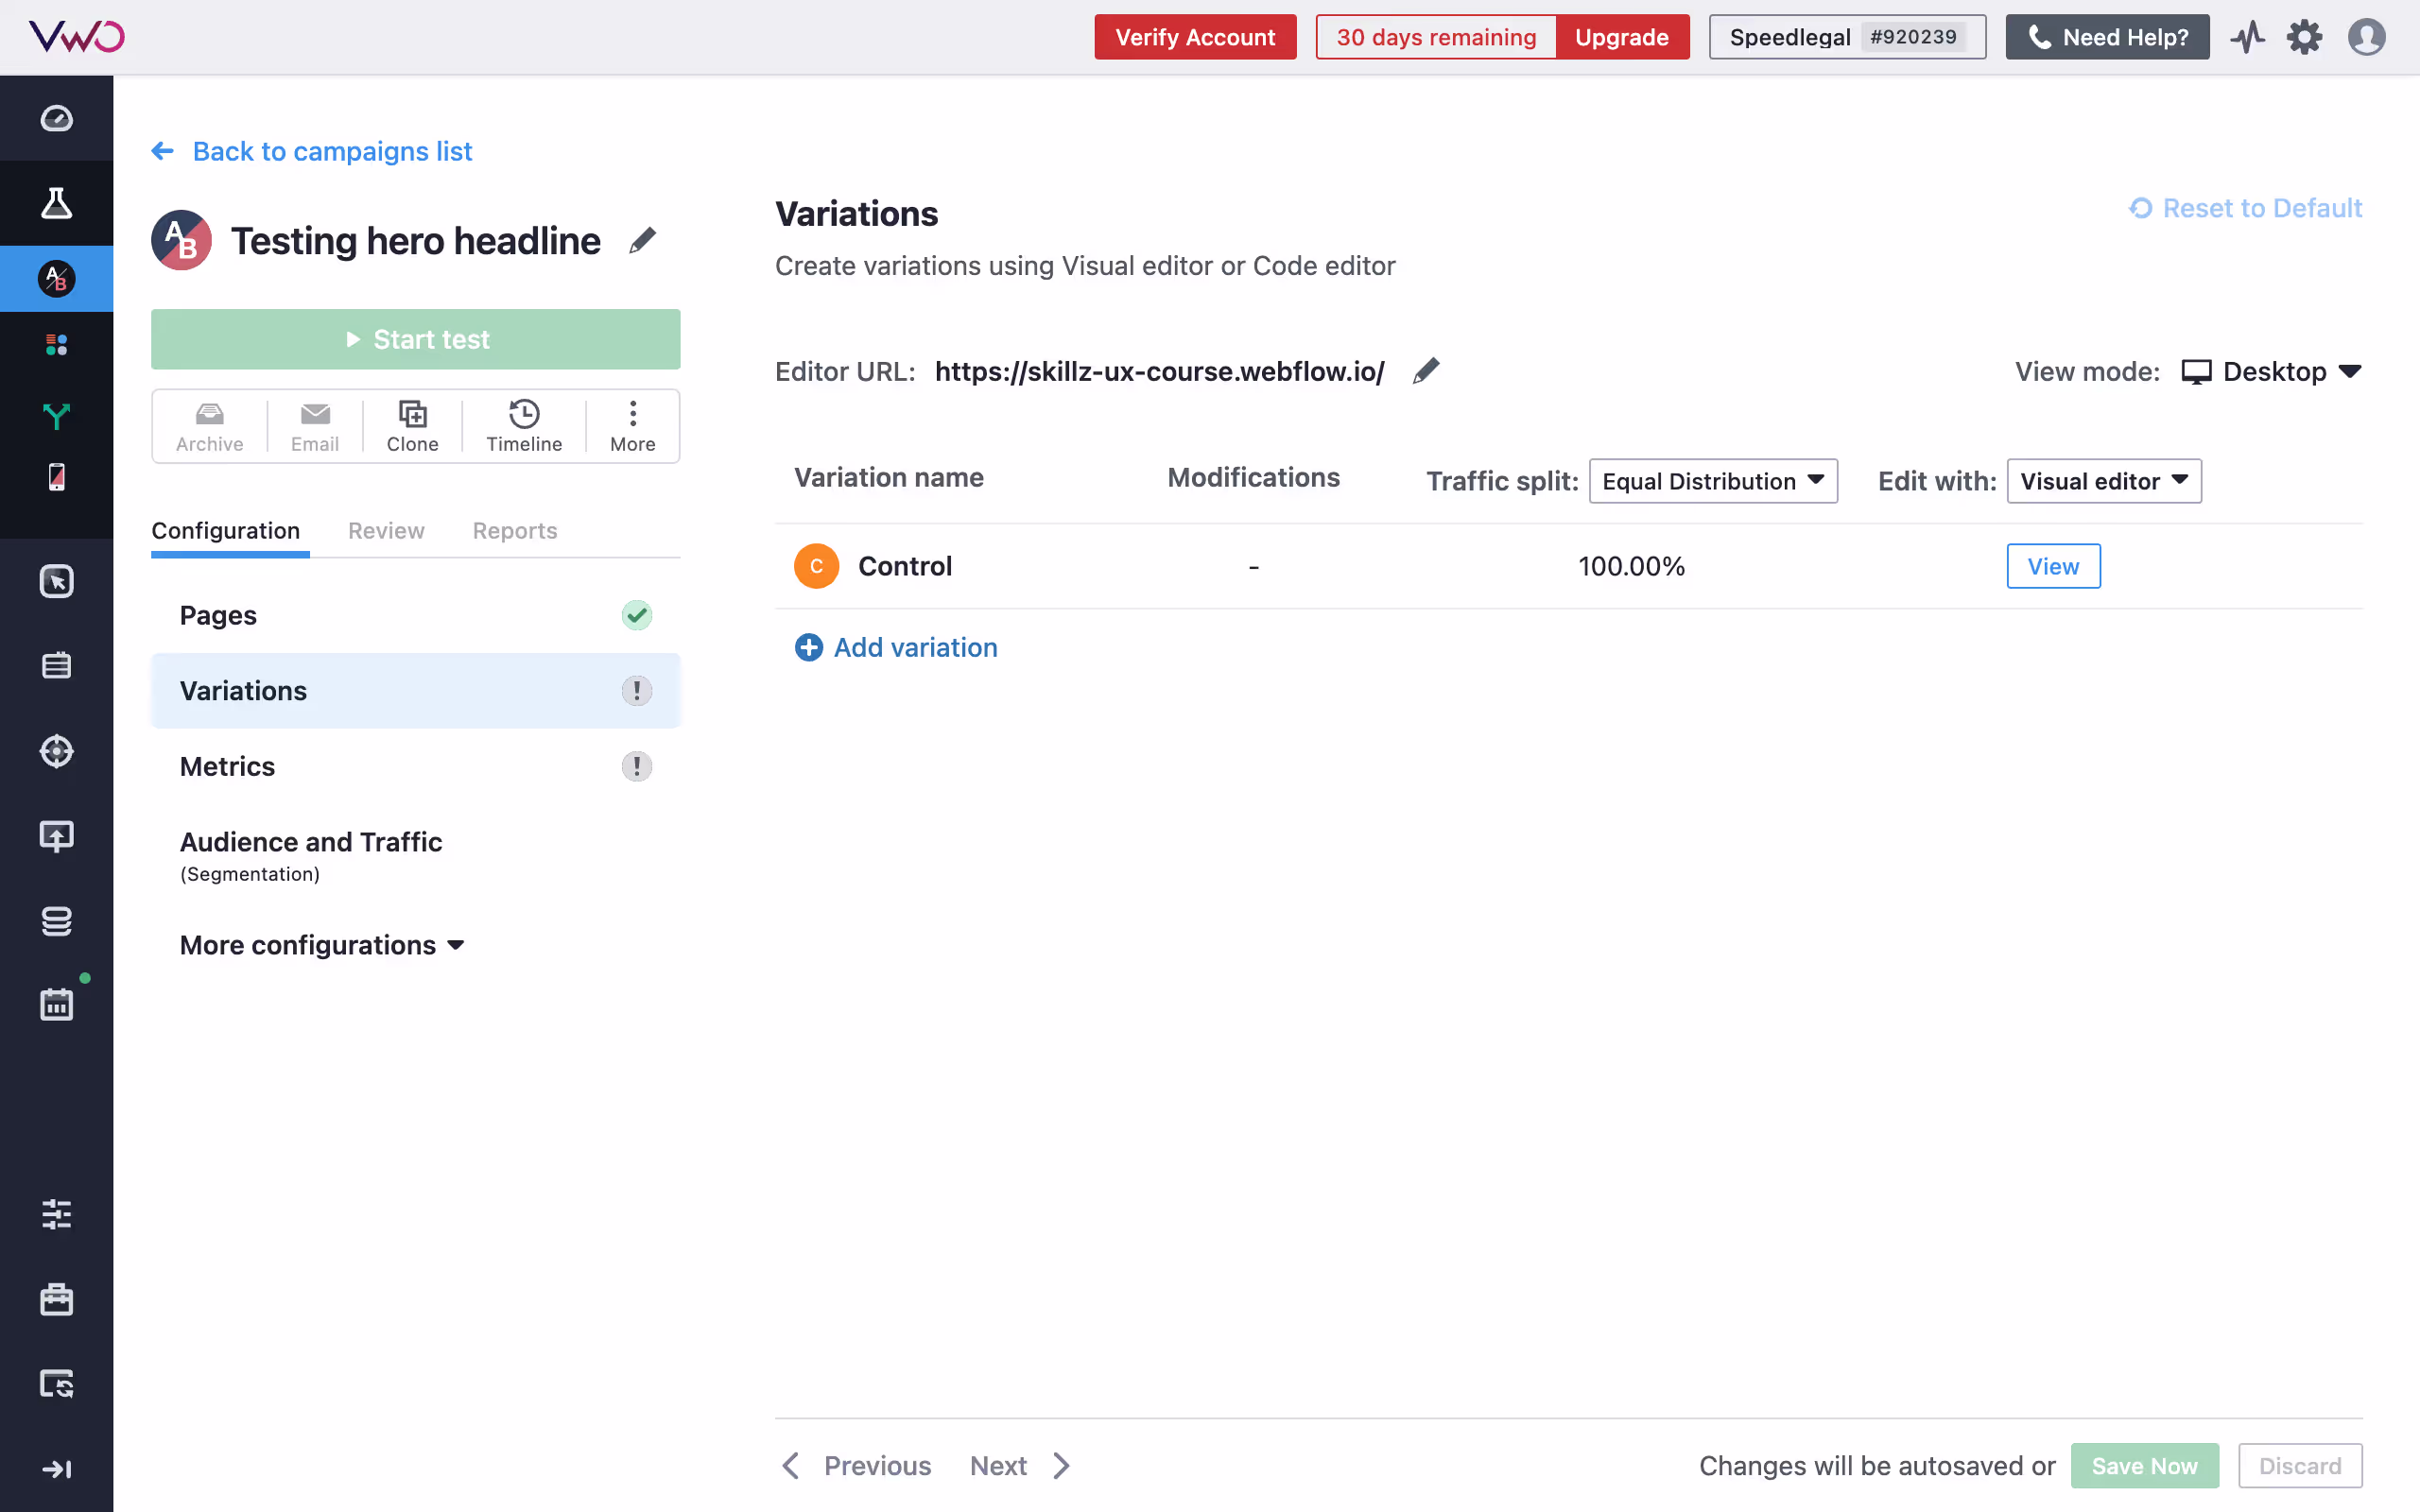
2. Editing Variation: Once done, click on ‘Edit’ to start editing your variation. This will open an editor where you can select and change the text like you’d normally do on Webflow. (You can also do a bunch of more things like rearrage text, add custom code, add or remove classes or change images, but we’ll keep the test simple for now.)
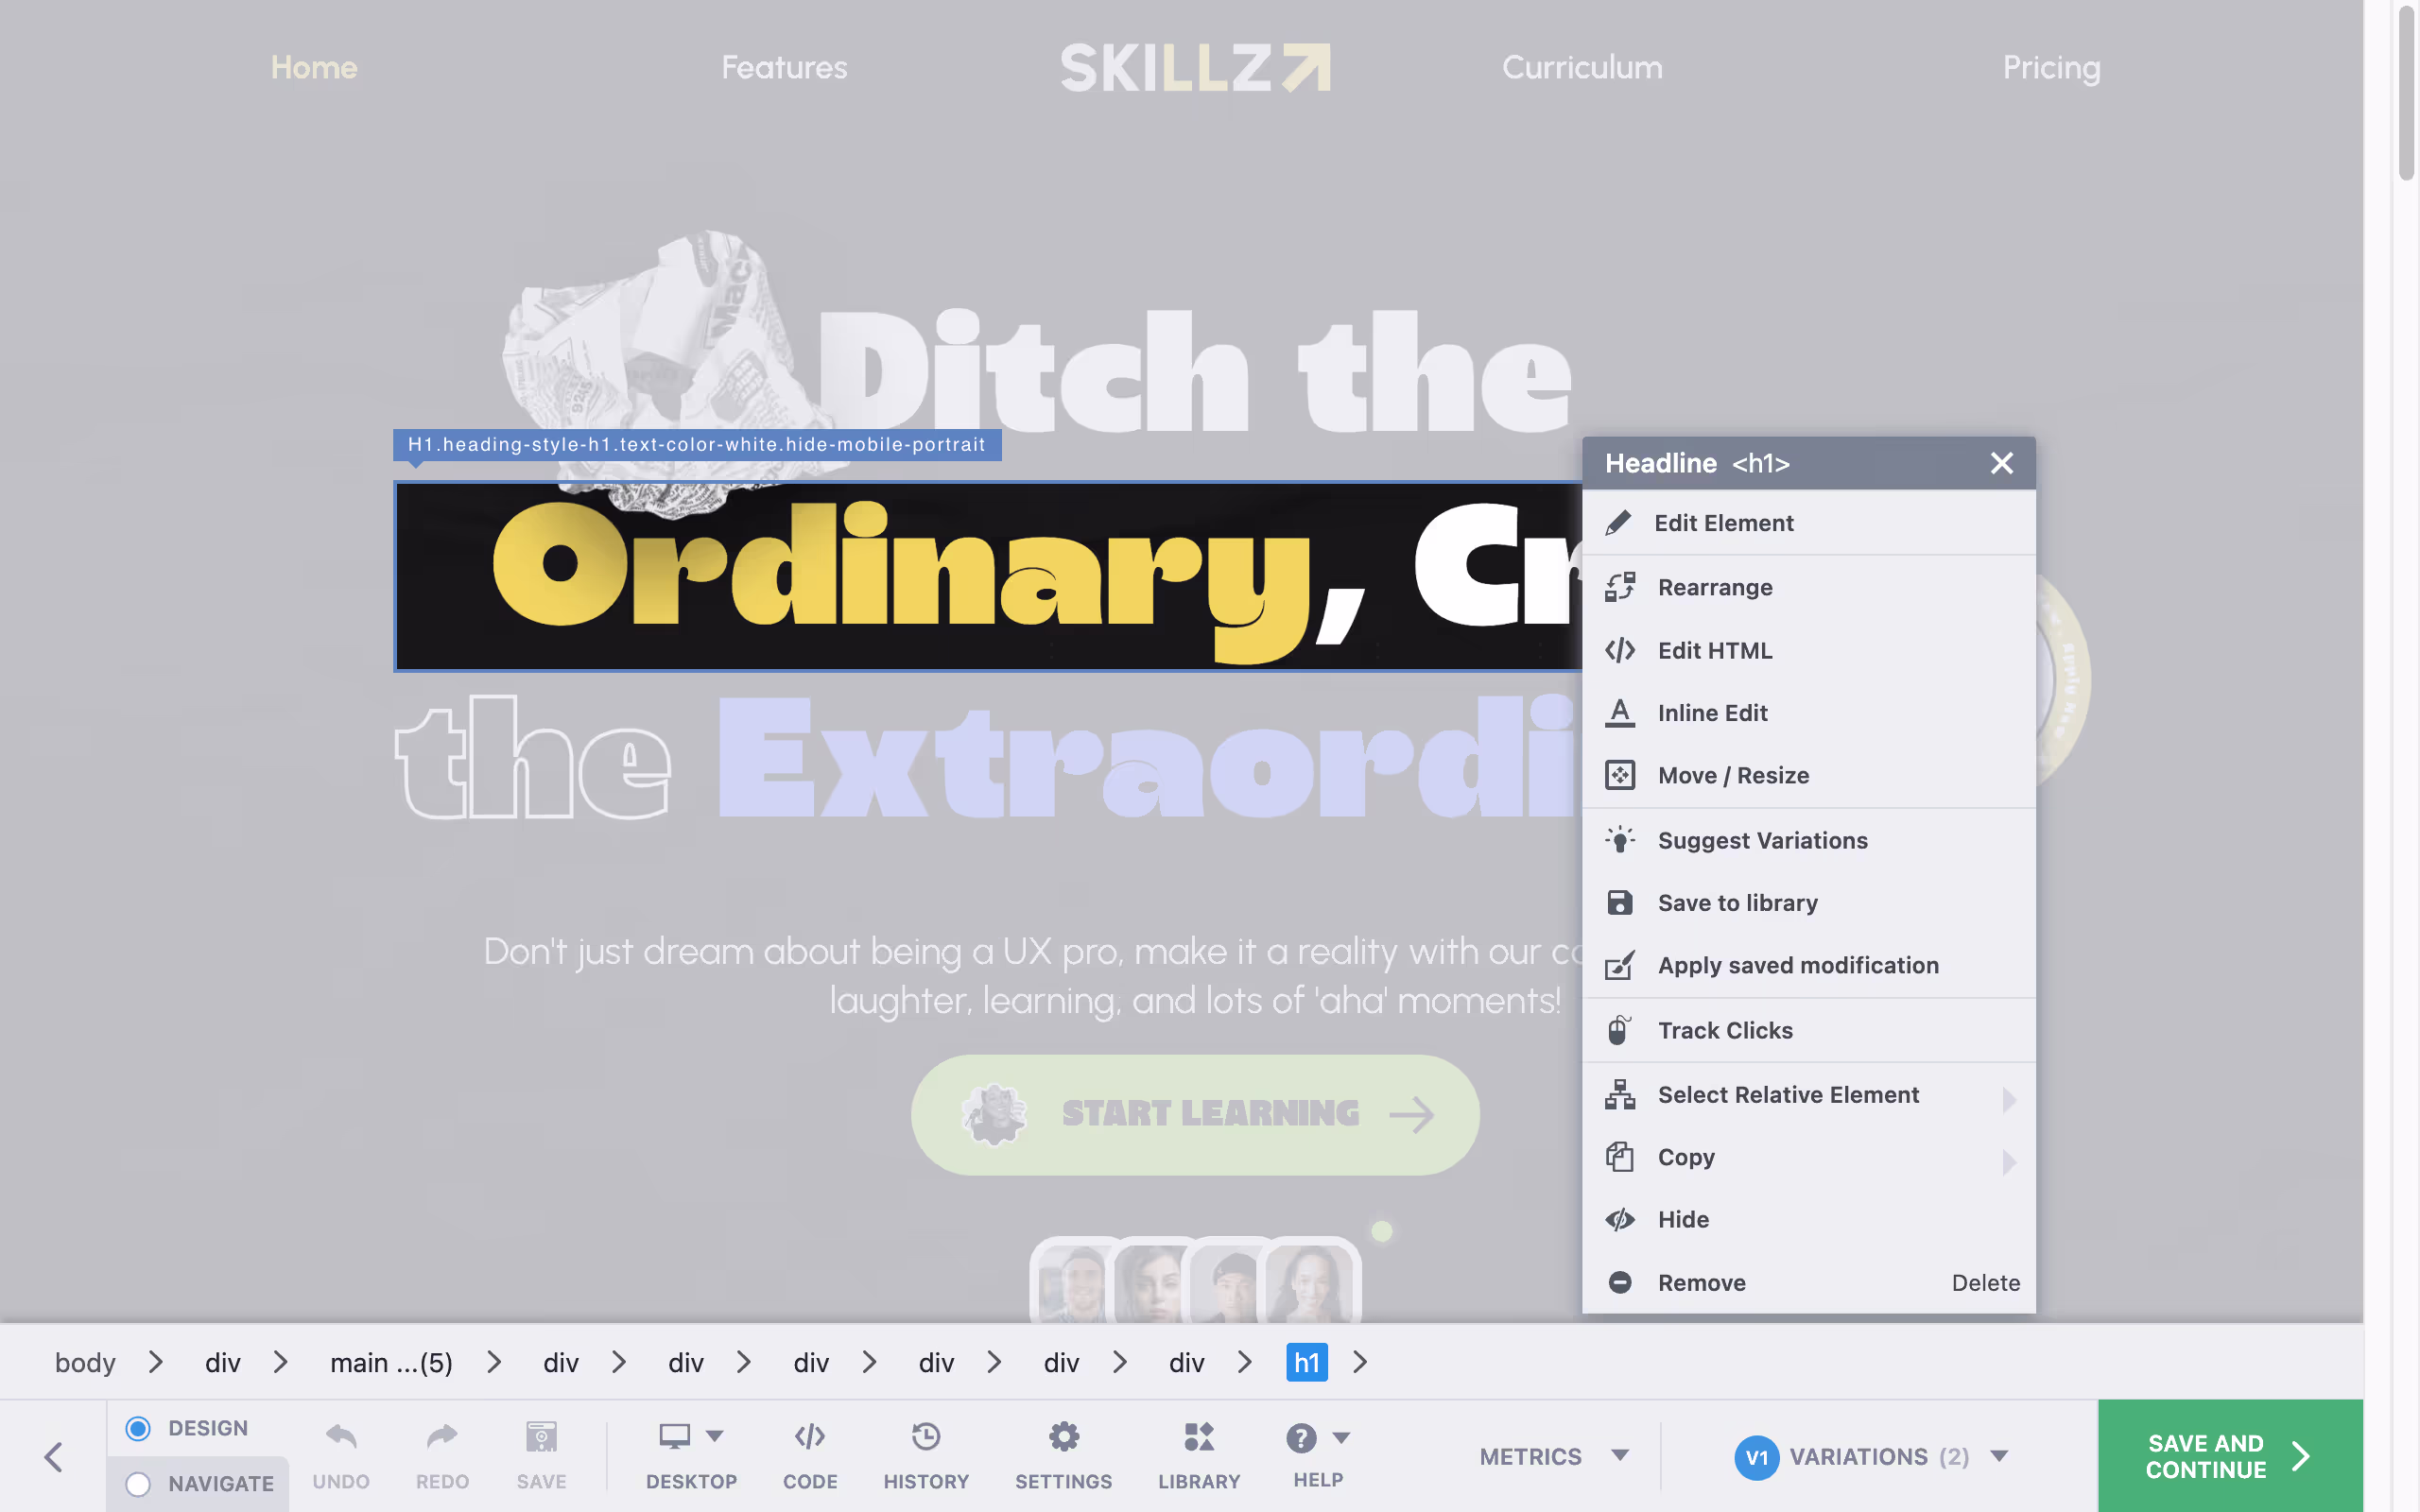
3. Preview and publish: Once you’ve edited the headline, preview how it looks on smaller devices, and once you are satisfies, hit ‘save and continue’.
Step 5: Set Goals for Your Test
Now that you have your variations ready, we’ll define what metrics we want to test.
1. Define Your Objectives: Set clear goals for your A/B test. For this example, We’ll set form submission as one of the KPIs

Step 6: Target Your Audience
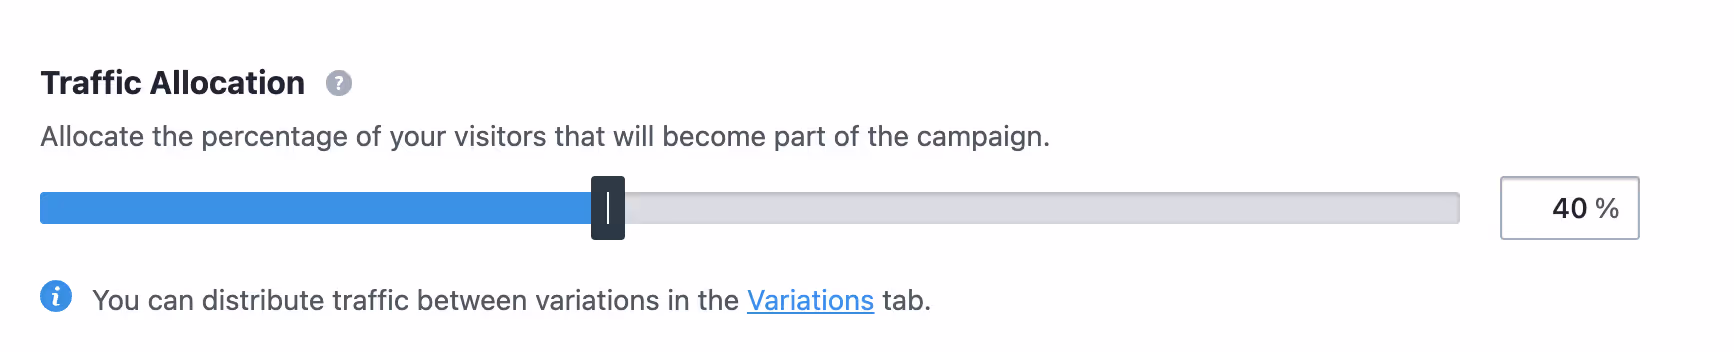
1. Segment Your Audience:With VWO, you can create custom segments of your audience that you want to target. This could be based on location, devices or other user behaviours. For this test, we’ll target all visitors.

2. Set Traffic Allocation: You can decide how much of your traffic should be a part of this test. for example if you get 1000 users a day, and you only want to run this test 400 of them, you can set this bar to 40%
Step 7: Run the Test
1. Start the Test: Once you’ve reviewed all your changes and are satisfid with it, click on 'Start Test' to begin. VWO will then start showing the different variations to your visitors and collecting data on their interactions.
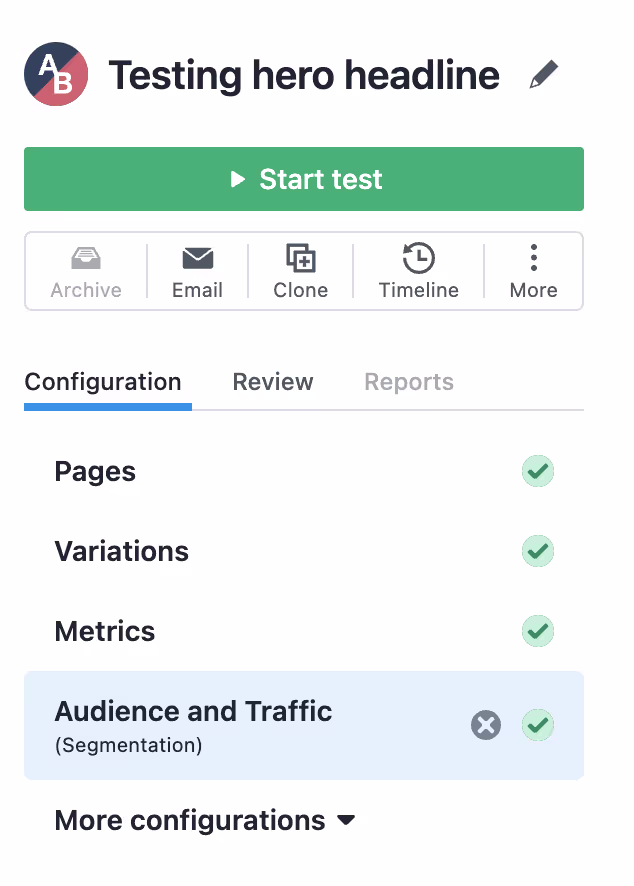
2. Monitor the Test: Congrats! You’ve successfully created your first test. Now keep an eye on your test as it runs.
Step 8: Analyze the Results
Give your test adequate time to run, and once that’s done, you can review the results to see which headline worked better.
- Review Performance Metrics: VWO will provide detailed reports on conversion rates, engagement metrics, and other key performance indicators for each variation.
- Determine the Winner: Based on this data, you can determine which headline performed better and met your goals.
- Implement the winning variation: If Version B significantly outperformed Version A, implement those changes on your live site.
Now that you are familiar with using VWO for your A/B tests, let’s see how you can setup the same A/B test using Optibase.
Step-by-Step Guide to A/B Testing (with Optibase)
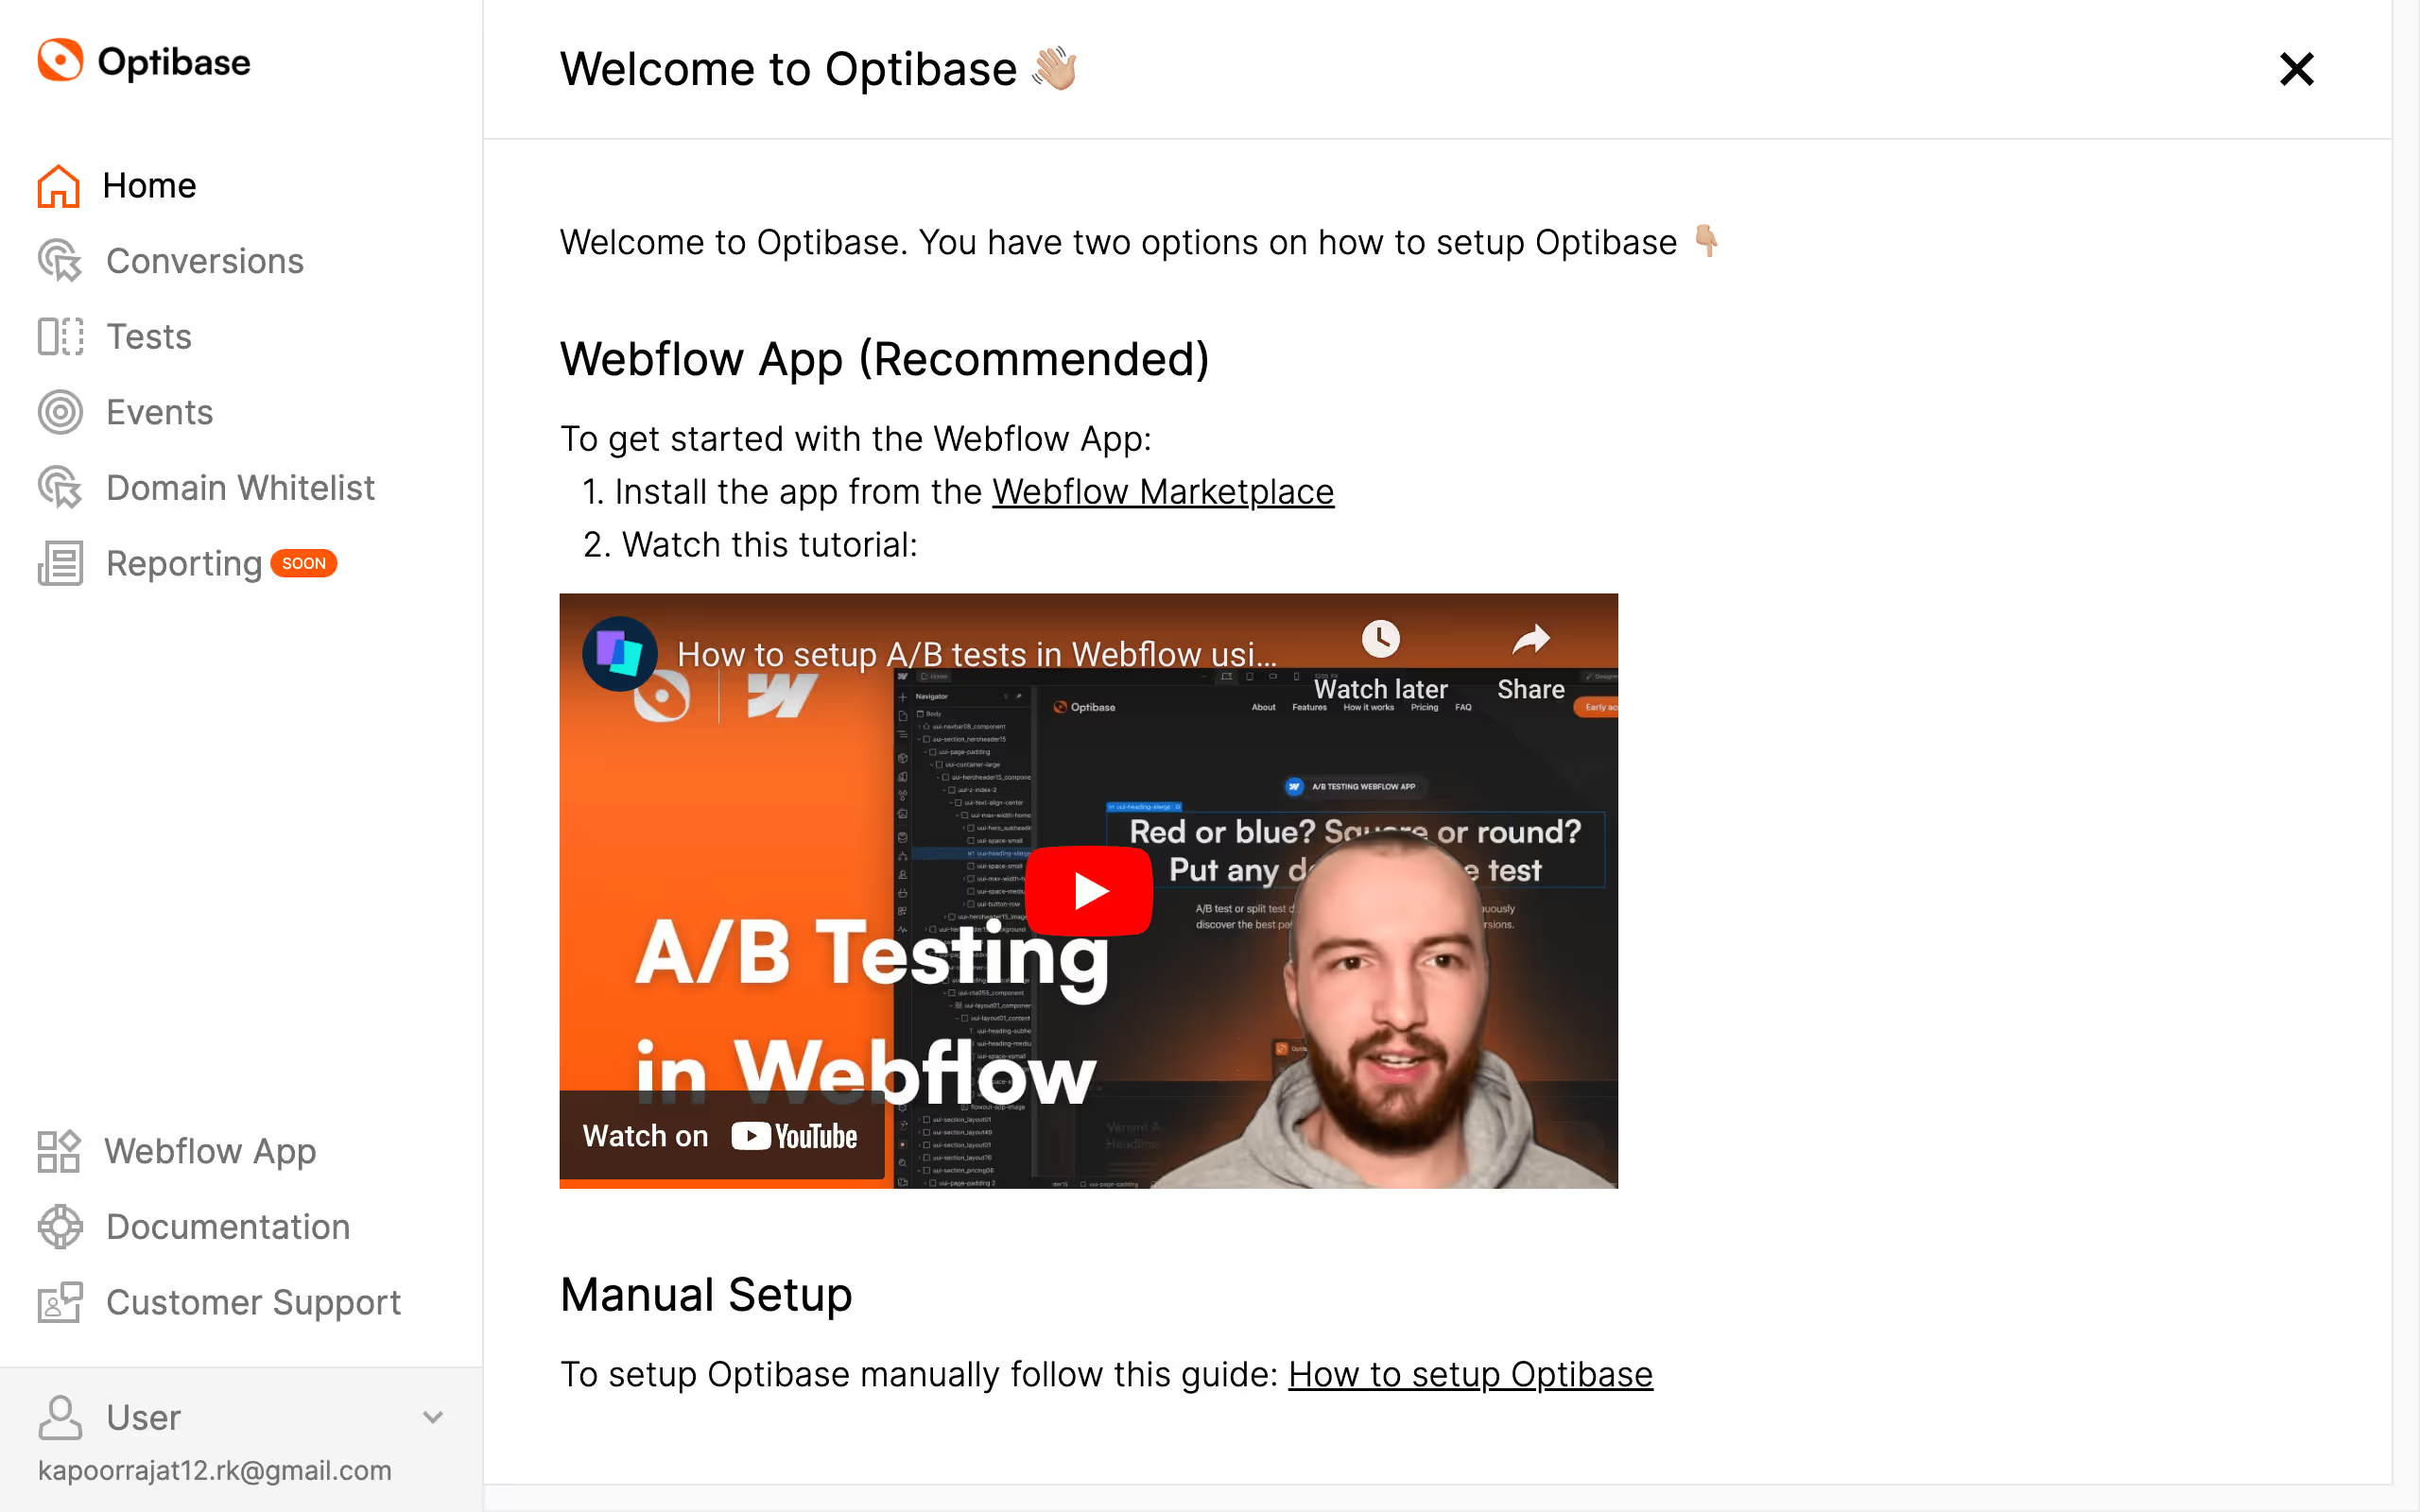
Optibase provides two options for setting up A/B tests on your Webflow site: using the Webflow App or manual setup. In this guide, we'll focus on the Webflow App method since its faster to both implement and experiment. We’ll use the same example as before to keep things simple.
Step 1: Sign Up and Create an Account
1. Visit the Optibase Website: Go to the Optibase website and sign up for an account. If you already have an account, log in.
2. Setup Optibase: Once logged in, you’ll see 2 options to set it up - Using Webflow App, or manual setup. We’ll go with the Webflow App method.
Step 2: Install the Optibase App from the Webflow Marketplace
1. Go to Webflow Marketplace: Click the Webflow Marketplace link from the app, or manually search for Optibase in the Webflow marketplace, and click on ‘Install App’.
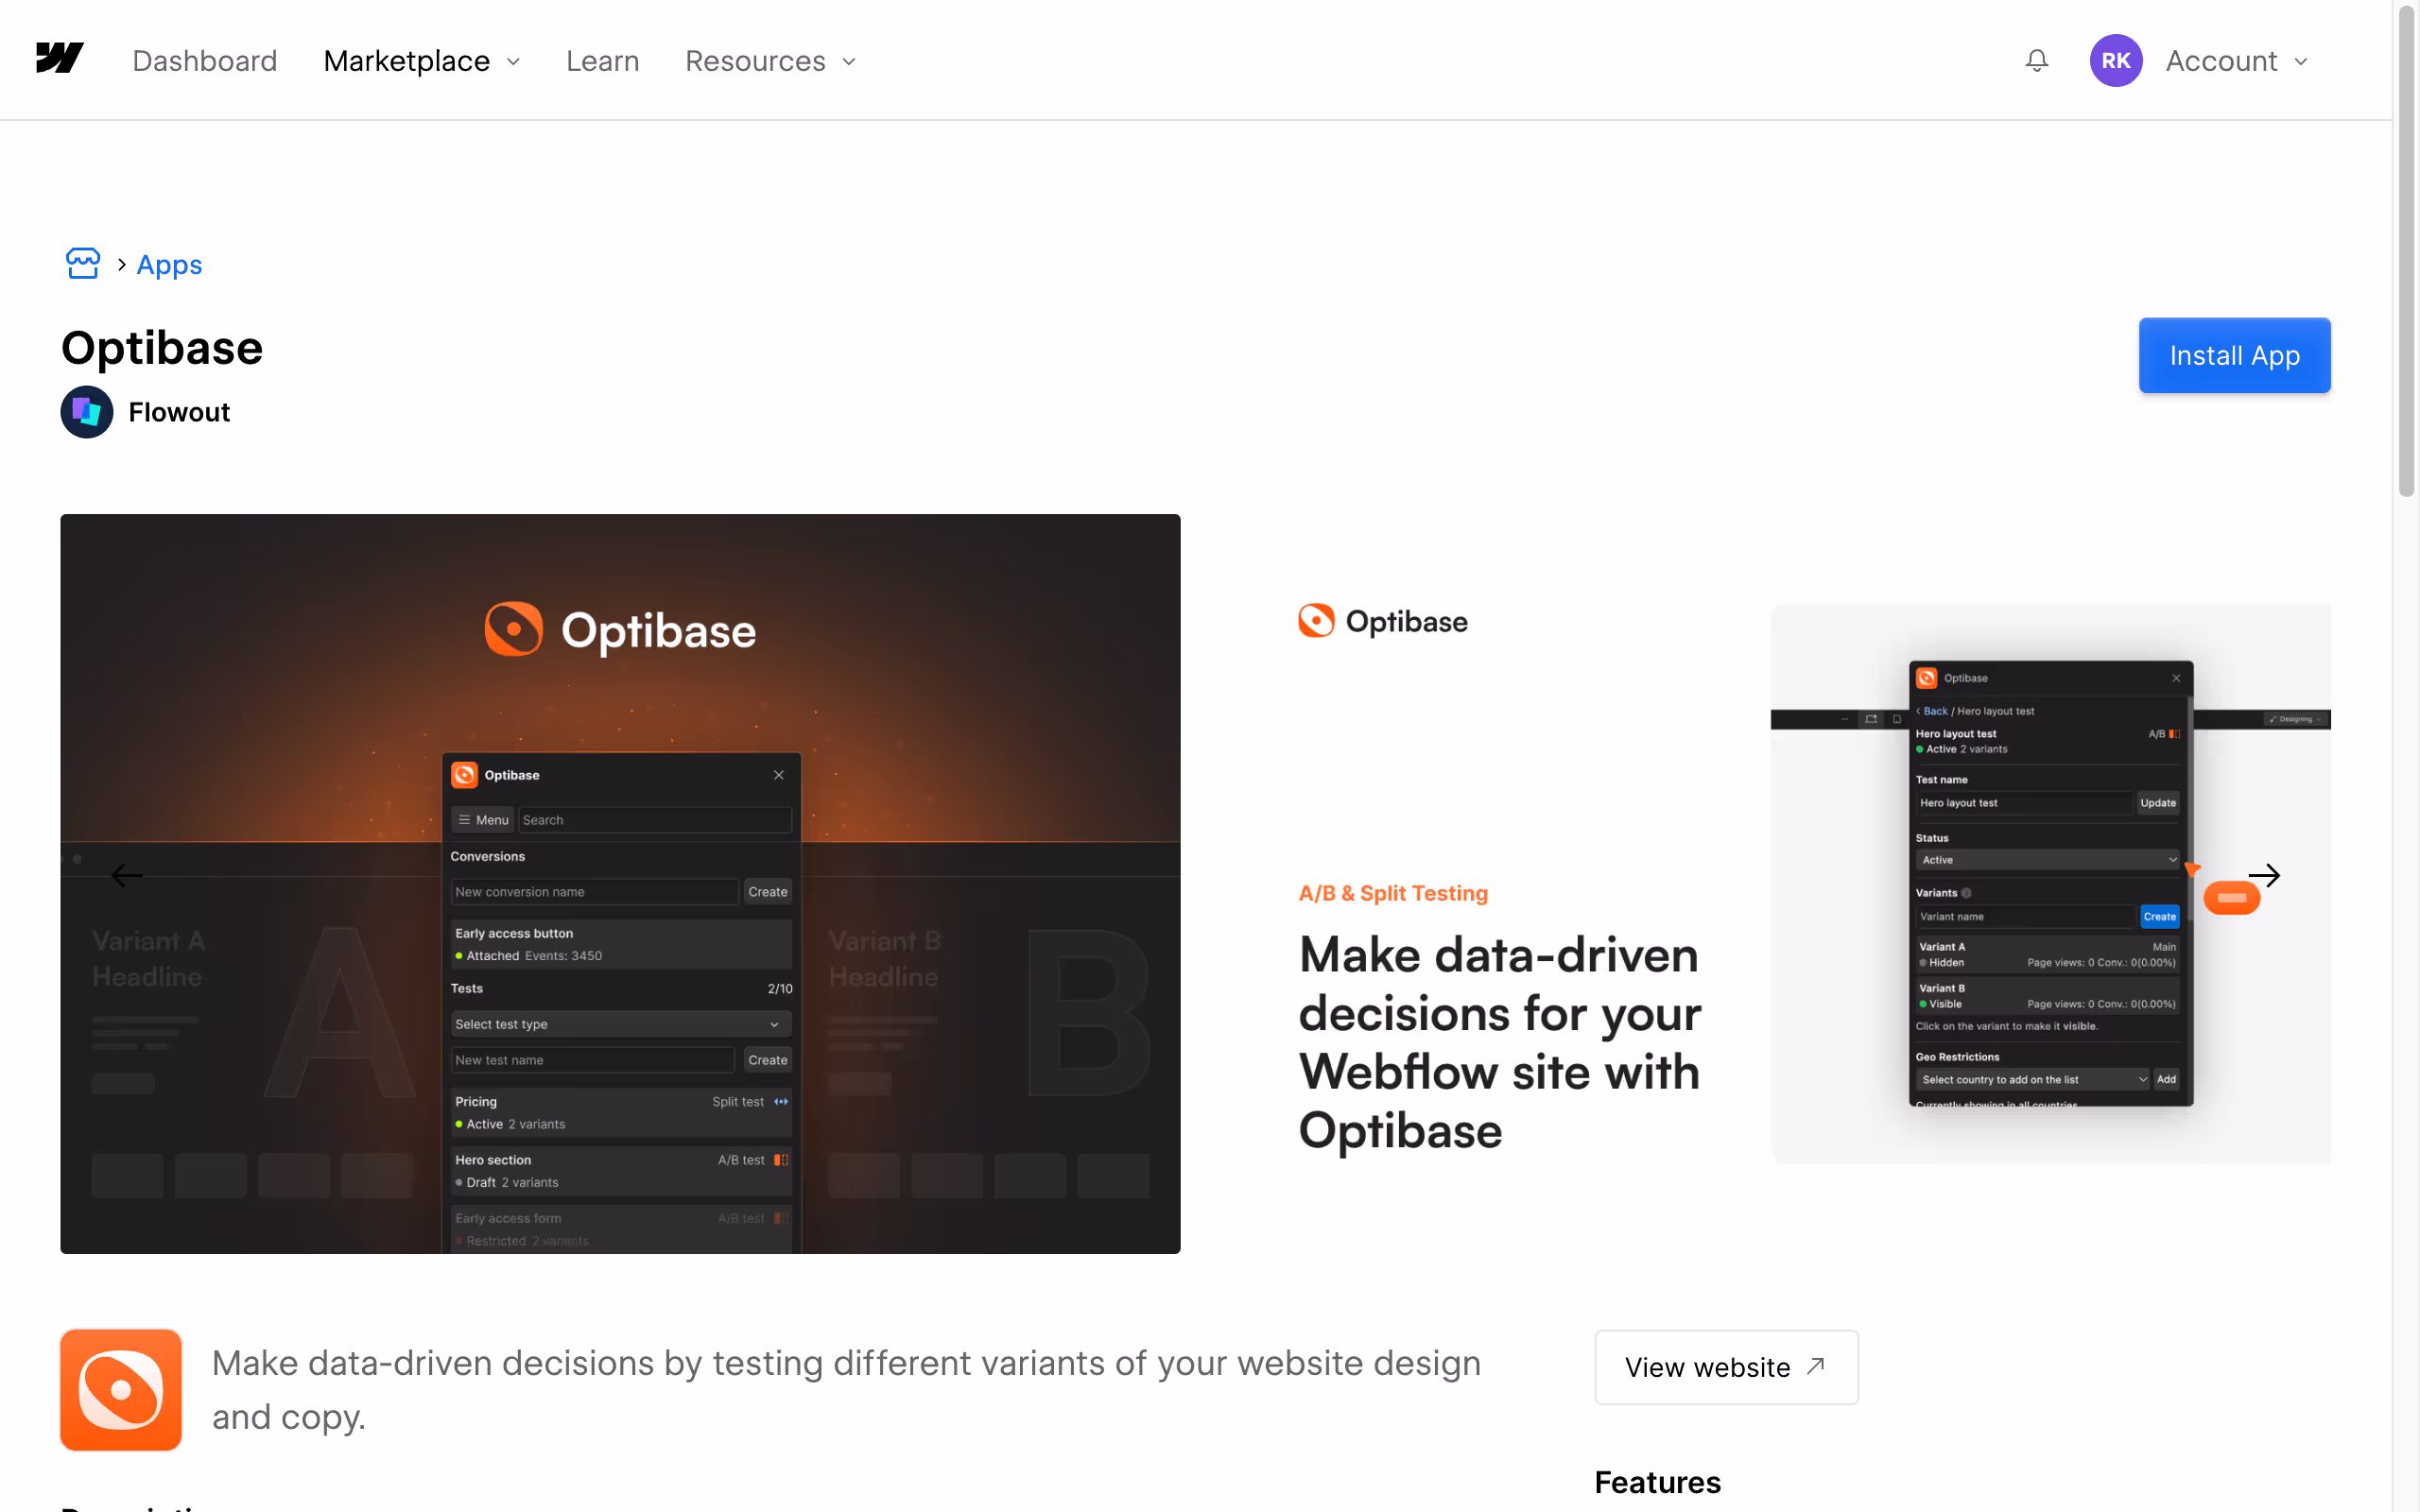
2. Install the App: Select the website you want to connect it with, and authorize it.
Step 3: Connect Optibase to Your Webflow Site
Now that the app is installed, we’ll need to connect Optibase to the site as well
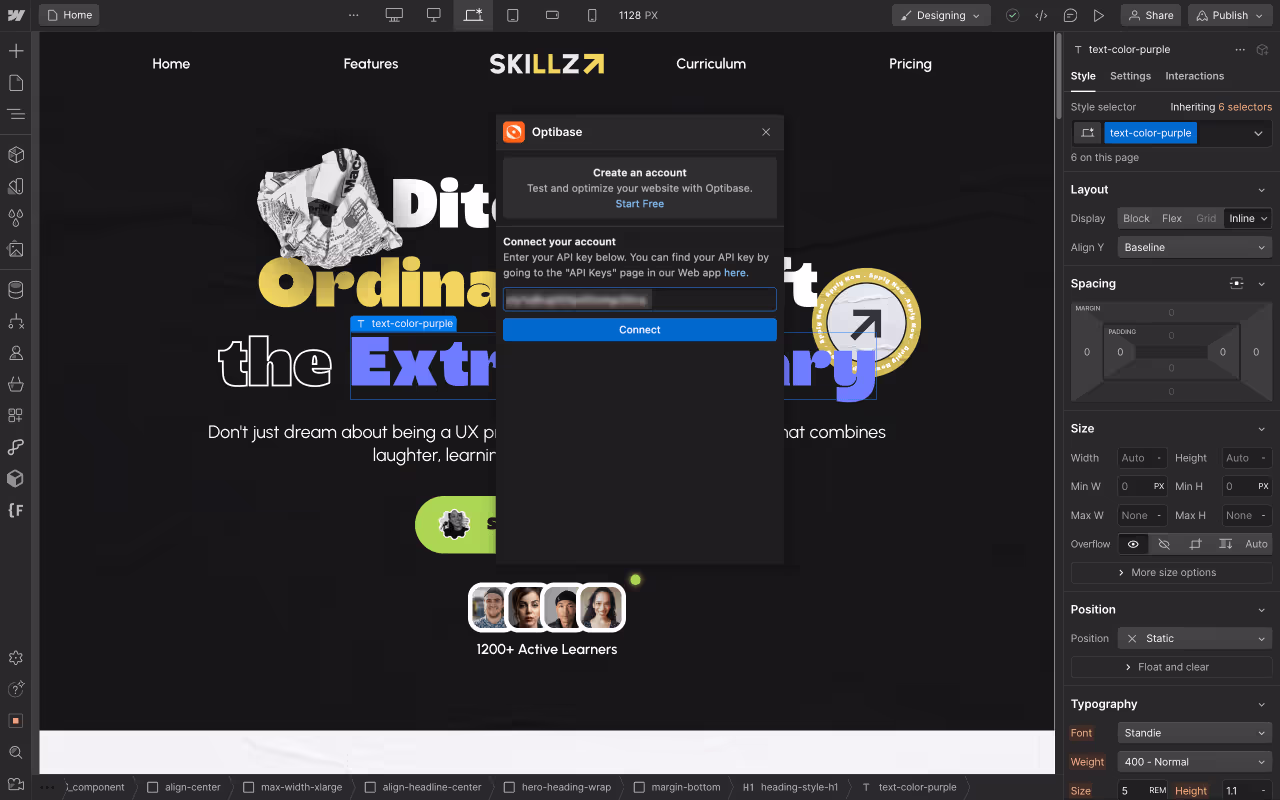
1. Generate API Key: In the Optibase web app, click on your profile > select API Keys > copy the secret API key
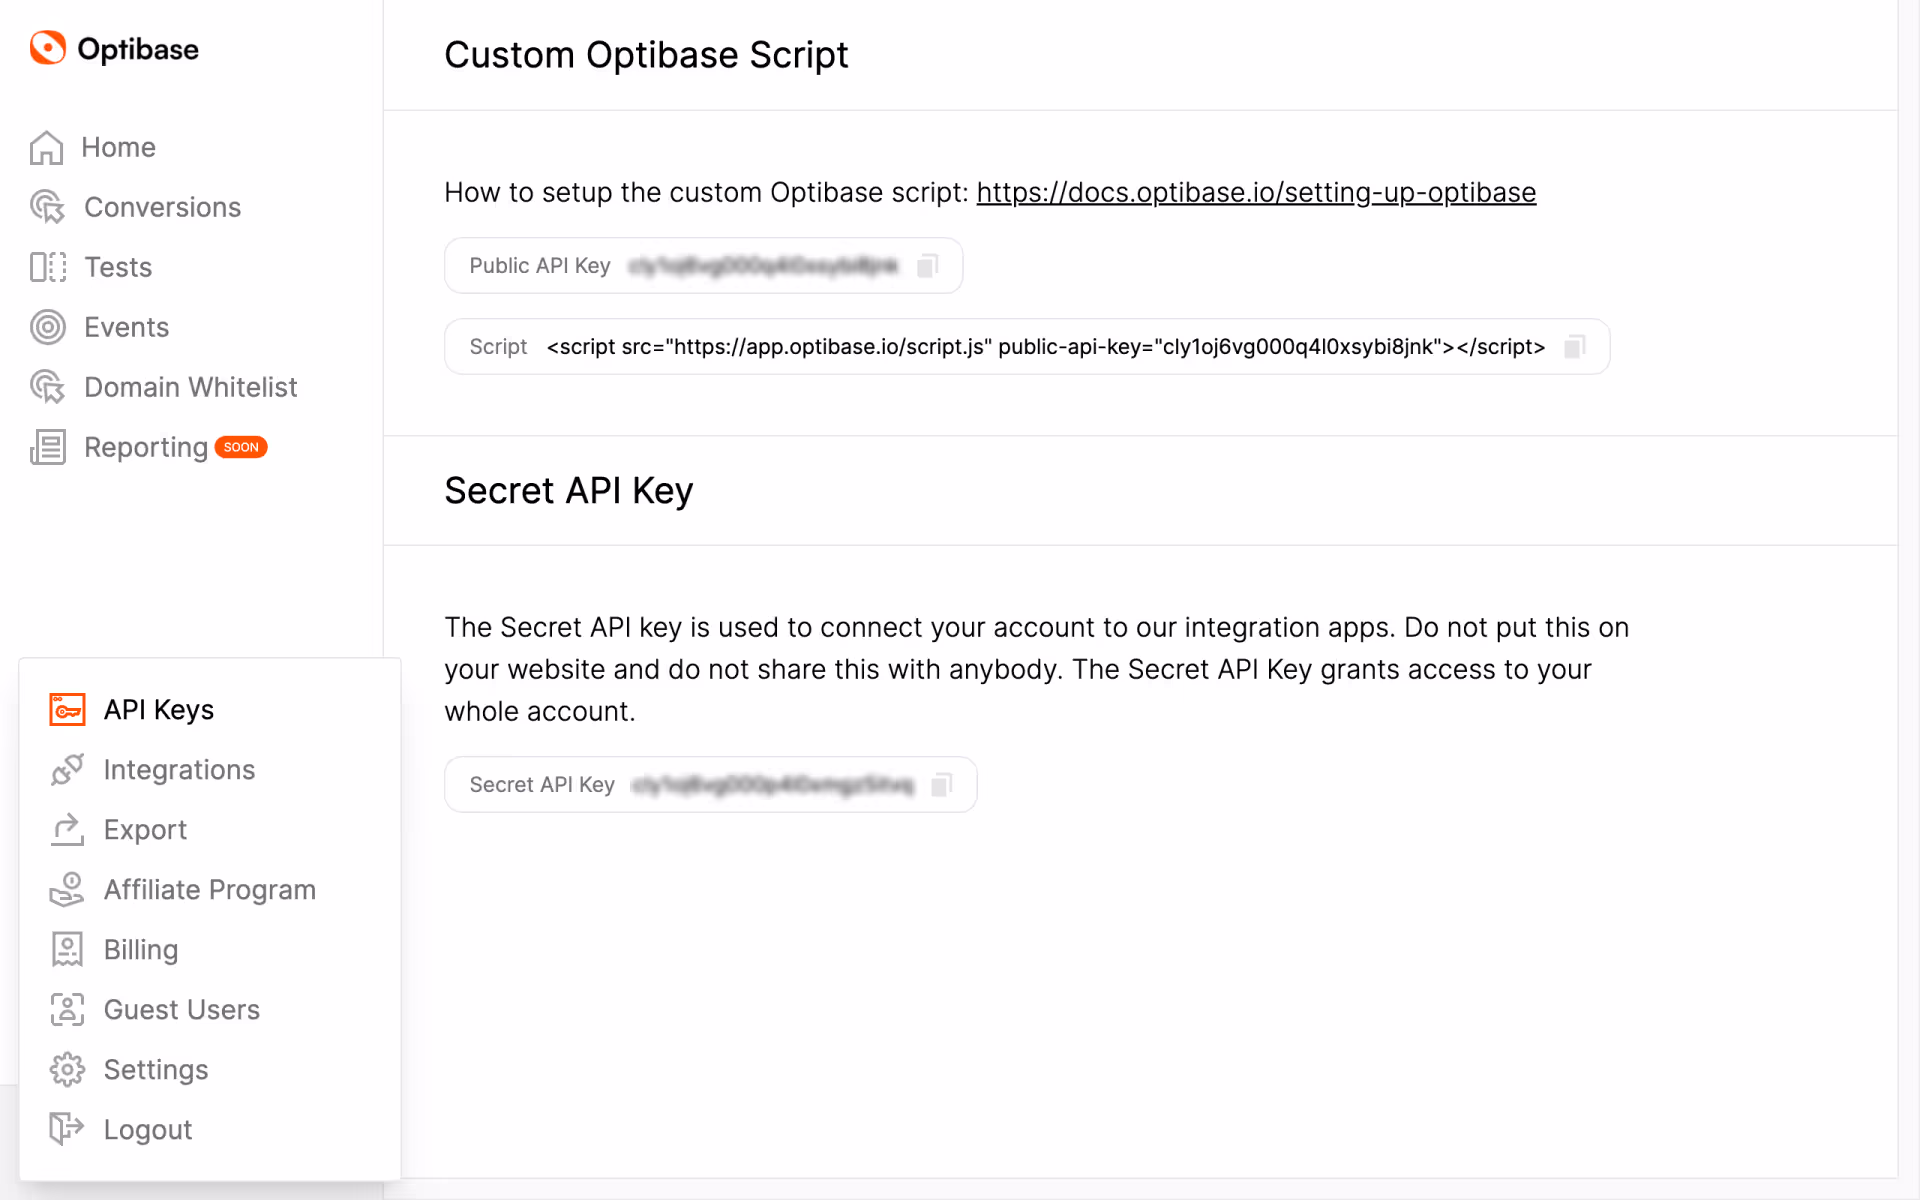
2. Authorize Access: Open apps in your Webflow Designer (Press E) and paste the secret key. Then hit ‘connect’
Step 4: Install the Optibase Script
Next, you’ll be asked to install a script on your site.
1. Copy the Script: From the popup, copy the given script.
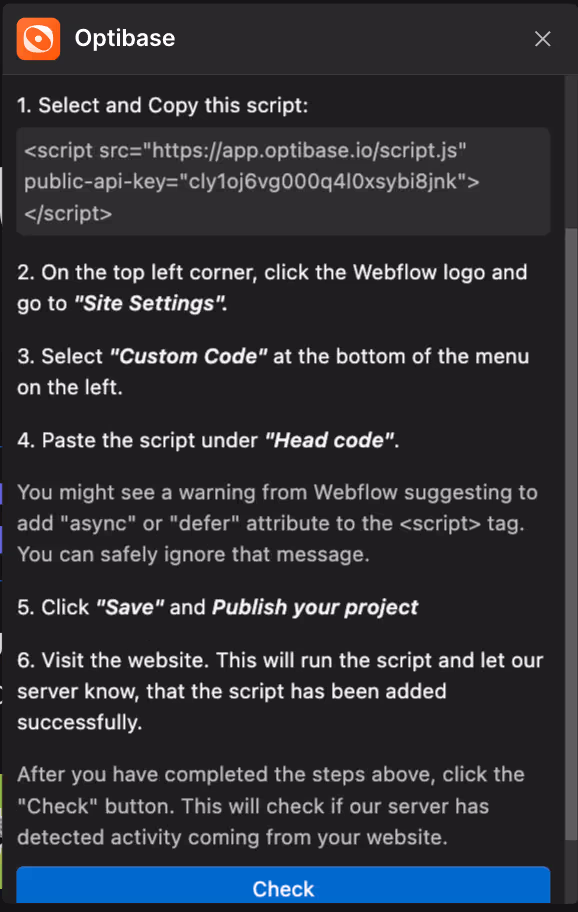
2. Add Script to Webflow:
- Go to your Webflow dashboard.
- Navigate to Project Settings > Custom Code.
- Paste the Optibase script into the Head Code section.
- Save changes and publish your site.
Step 5: Create Conversion Goals
Once you publish and verify the connection, you can start creating your first A/B test.
1. Define Conversion Goals: The first step is to define the conversion goal you want to track. For this example, we'll set goals for ‘Scroll Depth’ and set it to 50% scroll.
-min.avif)
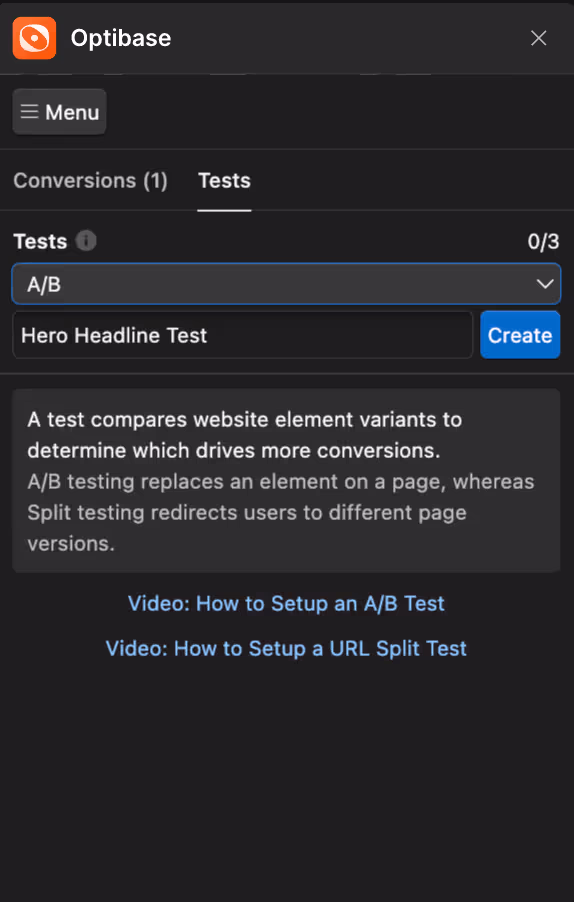
Step 6: Create a New A/B Test
Next we’ll move on to creating your first A/B test in Optibase.
1. Start a New Test: In the same popup, click on 'Tests' and select 'A/B Test' from the list of test types.

2. Name Your Test: Enter a name for your test, such as "Hero Headline Test", and hit ‘create’
Step 7: Design Your Variations
1. Create Variations: Now, we’ll move on to creating variants to test the headlines.
- Create your first variant > select the hero heading element > click ‘connect’. This becomes your variant A
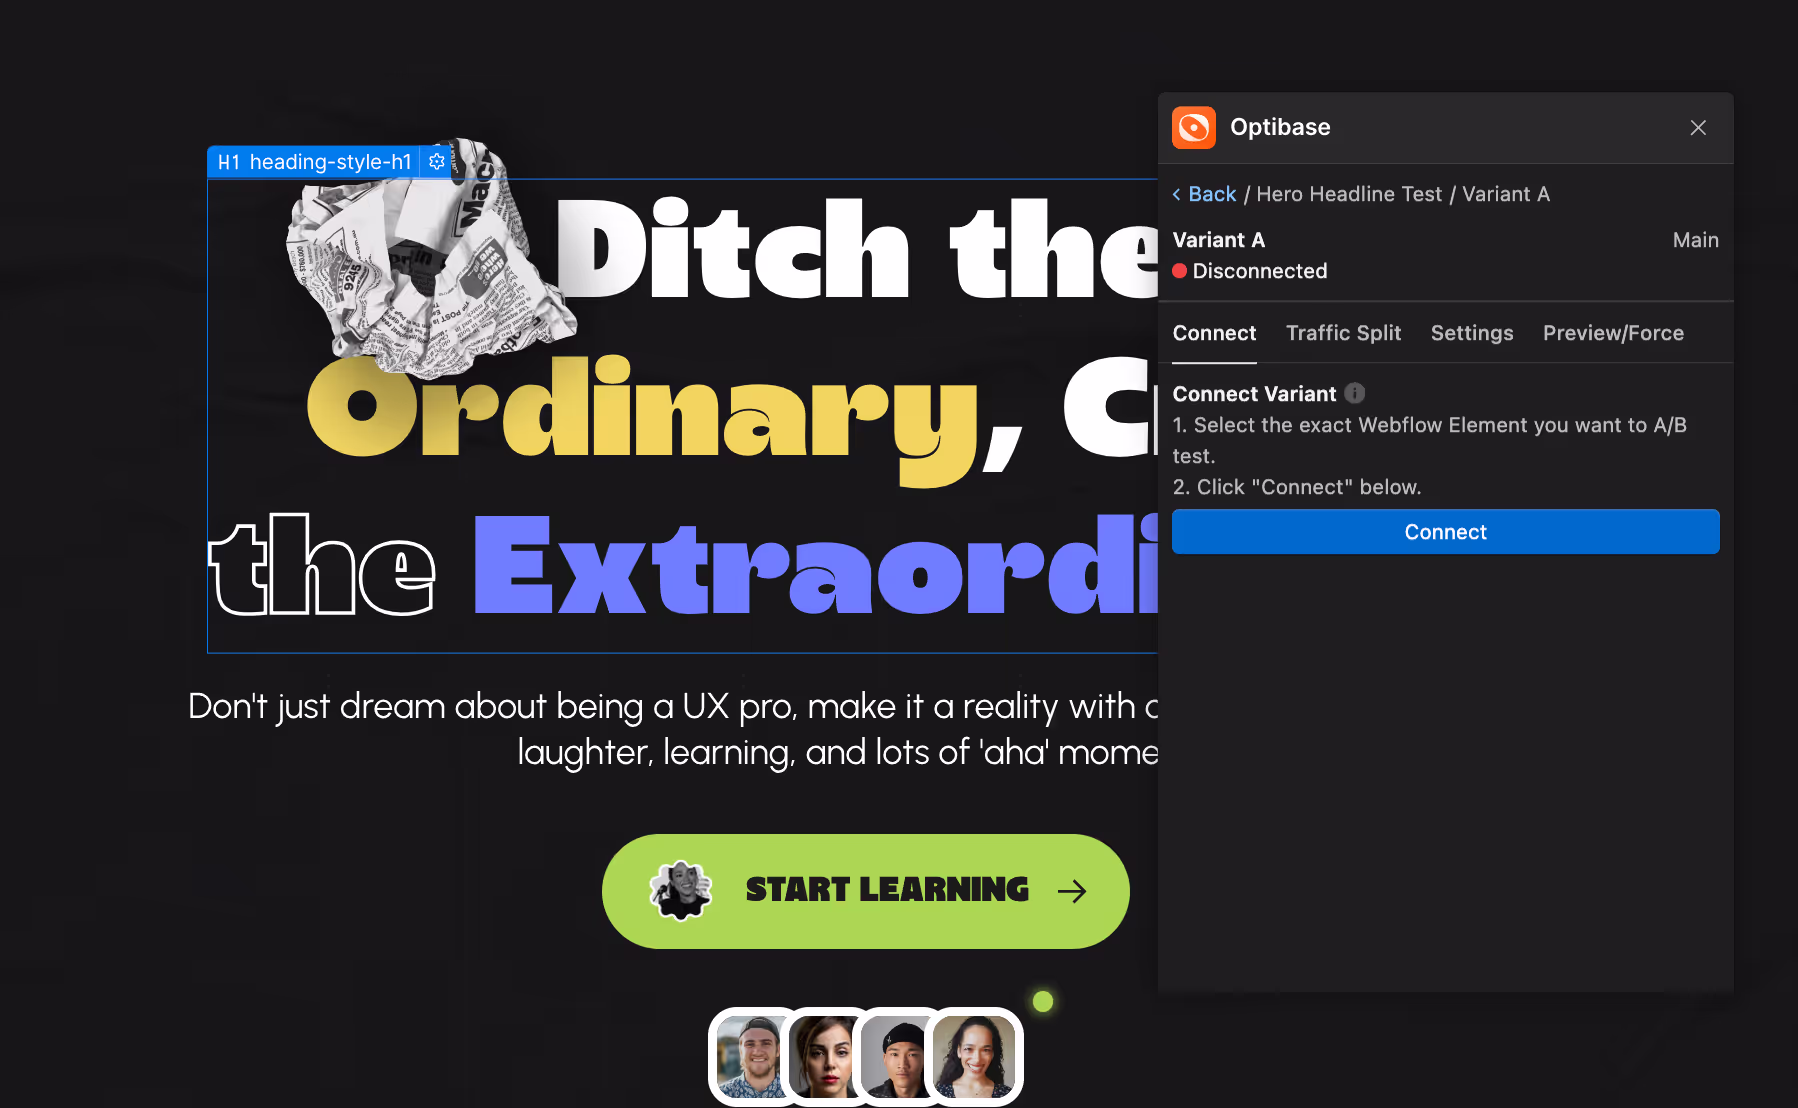
- Similarly, create a Variant B, but this time, duplicate the hero heading, and select that before you connect.

- You can now change the content of Variant B to test both headings.
Step 8: Set Restrictions
You can also add restrictions to your tests such as showing it only on desktop devices or testing only on a specific country. By default, the test will run on all devices and show to all audiences.

Step 8: Run The test
Once you are made changes in your variations and set your desired restrictions, change the status of your A/B test from ‘Draft’ to ‘Active’, and your tests will begin.
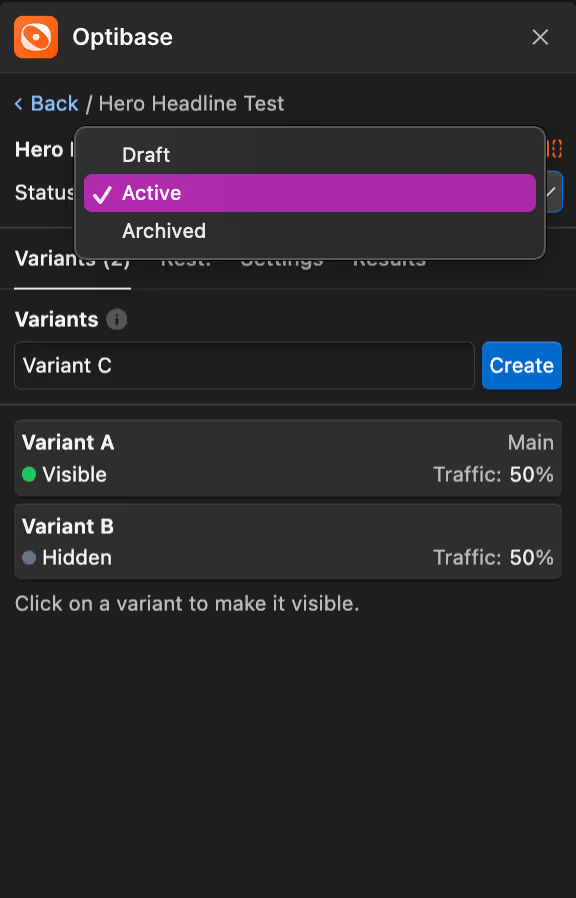
There you have it! You’ve successfully set your first A/B test using Optibase.
Once your test has had adequate time to run, you can review your results in Optibase Web app dashboard or on the Webflow app, and find out which version your users resonated with the most. This will be your winner variant.
Best Practices for A/B Testing
Now that you know how to run A/B tests using both tools, we’ll move on to learning some testing best practices to make sure your A/B tests get you the best results.
1. Test One Variable at a Time
When running an A/B test, focus on one variable at a time. This could be the headline, CTA button, or any other element on your page. Testing multiple variables simultaneously can make it difficult to pinpoint which change led to the observed results.
2. Set Clear Goals
Define what success looks like before starting your test. Whether it's increasing click-through rates, form submissions, or sales, having clear goals will help you measure the effectiveness of your variations.
3. Ensure Statistical Significance
Run your tests long enough to gather sufficient data. Statistical significance ensures that the results of your test are reliable and not due to random chance. Use tools within your A/B testing platform to help determine when you've reached significance.
4. Use a Representative Sample Size
Make sure your test includes a representative sample of your audience. This means your traffic should be split evenly between the control and variation groups to get accurate and meaningful results.
5. Document Your Tests
Keep detailed records of all your tests, including hypotheses, variations, metrics, and results. This documentation will help you learn from past tests and refine your testing strategy over time.
6. Continuously Test and Iterate
A/B testing is an ongoing process. Continuously test new ideas and iterate on successful variations to keep optimizing your site.
7. Use Heatmaps and Session Recordings
Complement your A/B testing with heatmaps and session recordings to gain deeper insights into user behavior. These tools help you understand how users interact with different elements on your site, providing context for your A/B test results.
8. Segment Your Audience
Segment your audience based on factors like location, device type, and user behavior to tailor your tests to specific groups. This can help you identify which variations work best for different segments of your audience.
9. Avoid Testing During Major Changes
Avoid running A/B tests during significant site changes or marketing campaigns. External factors can skew your results, making it hard to isolate the impact of your variations.
10. Analyze and Implement
After your test concludes, analyze the data thoroughly. Determine which variation performed better and why. Implement the winning variation, but keep testing new ideas to continually improve your site's performance.
The Future of A/B Testing in Webflow
With Webflow's acquisition of Intellimize, native A/B testing features are set to come in on Webflow by the end of 2024, and they are going to be great. Here’s what you can expect:

AI-Powered Personalization
Intellimize will bring some advanced AI capabilities to Webflow, focusing on creating personalized, engaging experiences for website visitors. This means you’ll be able to leverage AI to dynamically optimize your site's content and layout in real-time, based on visitor behavior and preferences.
Enhanced Testing and Optimization
- Page and Element Level Testing: Intellimize will enhance Webflow's capabilities in A/B testing, allowing for more detailed page and element-level experiments. This includes not only traditional A/B tests but also multivariate tests and personalization rules.
- Dynamic Personalization: With AI Optimize, you will be able to achieve one-to-one personalization at scale. This AI continuously learns and adjusts to each unique visitor, optimizing for various goals like form submissions, purchases, or account creations.
- Generative AI: Intellimize will also introduce generative AI features to help create content, such as headlines, body copy, and even entire pages. This will streamline the process of setting up A/B tests by generating variations automatically based on your inputs.
How will this impact you
- Increased Efficiency: The seamless integration of Intellimize will allow you to set up and manage A/B tests more efficiently, without the need for extensive technical skills. This means you can spend more time on strategy and creativity rather than on technical setup.
- Enhanced Personalization: AI-driven personalization will help you give each visitor a tailored experience that adjusts in real-time. This will leads to higher engagement, better user experience, and increased conversions.
- Faster Iterations: With AI Optimize, you’ll be able to test and iterate at a much faster pace. This means continous improvement and quicker deployment of successful variations, ensuring that the website always performs at its best.
- Comprehensive Insights: Intellimize’s advanced analytics will you get deeper insights into your A/B tests, helping you understand visitor behavior better and make data-driven decisions. This means to more effective optimizations and better business outcomes.
As Webflow rolls in their native A/B testing features, you can only expect the experience to get better and better.
Test. Iterate. Optimize
Remember, A/B testing is an ongoing process. The more you experiment, the more you’ll be able to understand your audience, and what moves them. By following these steps and using tools like VWO and Optibase, you can effectively run A/B tests and continuously improve your website's performance. Happy testing!
FAQs
What is A/B testing and why is it important?
A/B testing, or split testing, compares two versions of a webpage to see which performs better based on specific metrics like conversion rates or click-through rates. It's important because it allows you to make data-driven decisions, improving user experience and increasing conversions.
How do I set up A/B testing on Webflow?
To set up A/B testing on Webflow, you can use tools like VWO or Optibase. Install the tool, create your test variations, set goals, and start your test. Monitor the results to see which variation performs better.
What are the best tools for A/B testing on Webflow?
Popular tools for A/B testing on Webflow include VWO, Optibase, Crazy Egg, Google Optimize, and Optimizely. VWO and Optibase are preferred for their comprehensive features and ease of use.
How long should I run an A/B test?
Run your A/B test long enough to reach statistical significance. This depends on your website traffic and the difference in performance between variations. Typically, tests should run for at least 1-2 weeks.
Can I use A/B testing to improve my website’s SEO?
Yes, A/B testing can improve your website’s SEO by optimizing elements like headlines, meta descriptions, and call-to-action buttons, leading to better user engagement and higher search engine rankings.
What should I test in an A/B test?
You can test various elements, including headlines, images, call-to-action buttons, layouts, colors, and content. Focus on elements that directly impact user engagement and conversion rates.
How do I analyze A/B test results?
Analyze A/B test results by comparing key metrics like conversion rates, click-through rates, and bounce rates for each variation. Use statistical tools provided by your A/B testing platform to determine if the results are significant.
Is A/B testing suitable for small websites?
Yes, A/B testing is suitable for small websites. Even with lower traffic, you can still gain valuable insights by running tests over a longer period or focusing on high-impact elements.


.avif)