
.avif)

If you're about to launch your Webflow site and want to make sure it’s fully optimized for SEO, you're in the right place. This checklist covers all the important steps you’ll need to take to boost your site’s ranking and visibility on Google.
Webflow gives you some great built-in tools, but there are still a few things you’ll need to fine-tune yourself. From title tags to redirects, this checklist will guide you through everything you need to check off before going live.
To make things even easier, we’ve put together a Google Sheet version of this checklist so you can use it for your future projects.
Ready? Let’s begin.
Technical SEO Checklist
The first area we need to look at is Technical SEO. This is where you lay the groundwork to make sure your site can be crawled, indexed, and ranked effectively by search engines. In Webflow, much of the technical SEO is already done for you, but you’ll still need to tweak a few elements to make sure everything’s in good shape.
1. Set Title Tags & Meta Descriptions
- What to do: Make sure every page has a unique, keyword-optimized title tag and meta description. These will help search engines understand your content and encourage people to click on your site in search results.
- Best Practices:
- Keep titles under 60 characters and meta descriptions under 155.
- Include relevant keywords naturally in both.
- Use actionable, engaging language for better click-through rates.
- Where to do it in Webflow: Head to the Page Settings of each page and scroll down to the SEO settings to add your title and meta description.

2. Generate and Submit Your Sitemap
- What to do: Ensure the sitemap feature is turned on in Webflow and submit it to Google Search Console. This makes it easier for search engines to index your site.
- Best Practices:
- Enable Webflow’s auto-generated sitemap under Project Settings > SEO.
- Submit the sitemap through Google Search Console for faster indexing.
- Why it matters: A sitemap ensures search engines know about all the pages on your site, helping them crawl and rank your content efficiently.

3. Implement Canonical URLs
- What to do: Prevent duplicate content issues by setting up canonical tags, especially if you have similar pages or blog categories.
- Best Practices:
- Add canonical URLs to pages where content could be duplicated.
- Use the correct tag:
<link rel="canonical" href="URL" />.
- Where to do it in Webflow: You can set this under Page Settings > Advanced.

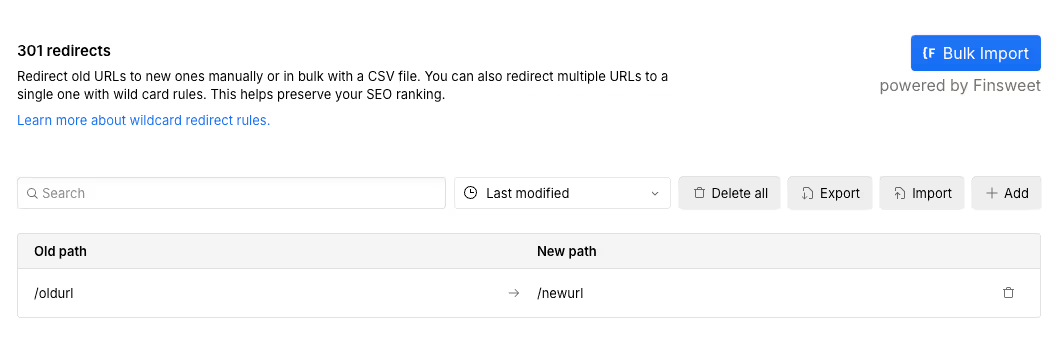
4. Set Up 301 Redirects
- What to do: If you’ve changed any URLs or removed old pages, set up 301 redirects to guide both users and search engines to the right place.
- Best Practices:
- Redirect old URLs to relevant new pages to avoid 404 errors.
- Use 301 redirects, which are permanent, to retain SEO authority.
- Where to do it in Webflow: Go to Project Settings > Hosting and scroll down to the 301 Redirects section.
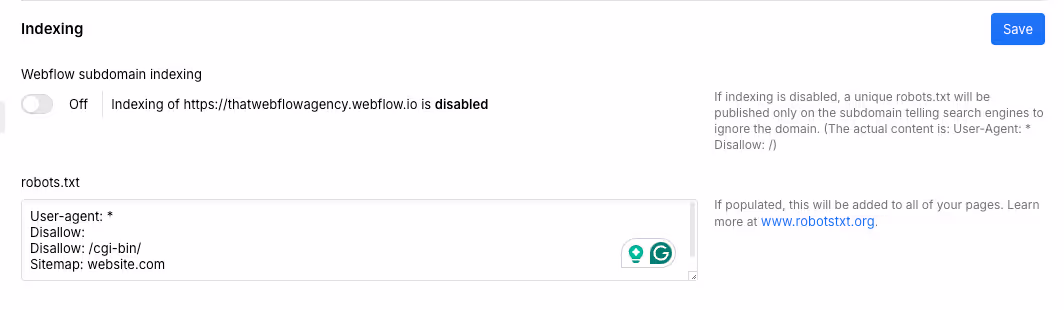
5. Optimize Robots.txt
- What to do: Use the robots.txt file to control which parts of your site search engines can crawl. This is useful for preventing certain pages (like a staging site) from being indexed.
- Best Practices:
- Block pages you don’t want to be indexed, like admin or staging pages.
- Always double-check that critical pages aren’t blocked.
- Where to do it in Webflow: Go to Project Settings > SEO and add custom rules to the robots.txt file.
On-Page SEO Checklist
Once the technical SEO is set, it’s time to focus on optimizing the actual content and structure of each page. On-page SEO ensures your content is accessible, relevant, and well-structured for both users and search engines.
Here’s the checklist to ensure it’s set properly -
1. Headings (H1, H2, etc.)
- What to do: Structure your content using the correct heading tags. This helps both search engines and users navigate your content.
- Best Practices:
- Ensure that you have only one H1 tag per page for the main topic.
- Use H2 tags for sections and H3 tags for sub-sections.
- Incorporate relevant keywords naturally within your headings.
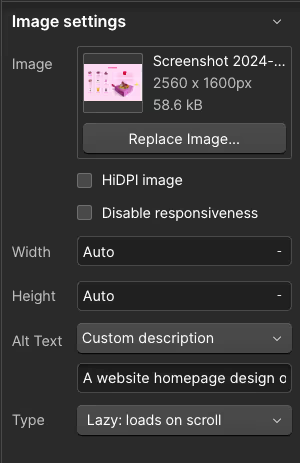
2. Image Alt Text
- What to do: Add descriptive alt text to all your images to improve SEO and accessibility.
- Best Practices:
- Use clear, concise descriptions that explain the image.
- Incorporate relevant keywords where appropriate, but avoid keyword stuffing.
- Ensure every image has unique alt text.
- Where to do it in Webflow: In the Designer, select an image, then go to Settings to add alt text.
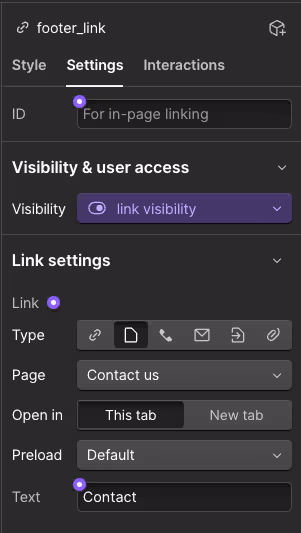
3. Internal Linking
- What to do: Create internal links between related pages to help search engines understand your site’s structure and guide visitors to relevant content.
- Best Practices:
- Use descriptive anchor text that includes keywords.
- Link to relevant pages naturally within the content.
- Ensure key pages are linked from multiple areas of your site.
- Where to do it in Webflow: Highlight text in the Designer, click the link icon, and add the appropriate internal URL.
4. URL Structure
- What to do: Make sure each page has a short, descriptive URL that includes your target keywords.
- Best Practices:
- Avoid long URLs, unnecessary words, and special characters.
- Keep URLs readable and easy to understand for both users and search engines.
- Where to do it in Webflow: Edit the page slug in Page Settings under the SEO section.
5. Optimize Meta Tags for Social Sharing (Open Graph Tags)
- What to do: Set Open Graph tags for each page to control how your content looks when shared on social media platforms like Facebook and Twitter.
- Best Practices:
- Use high-quality images with the correct dimensions (minimum 1200x630 pixels).
- Ensure your meta description is engaging and includes relevant keywords.
- Set a unique Open Graph image, title, and description for each page.
- Where to do it in Webflow: Go to Page Settings > Open Graph Settings to set the title, description, and image for social sharing.

Website Performance Checklist
Now that your content is optimized, it’s time to make sure your site performs at its best.
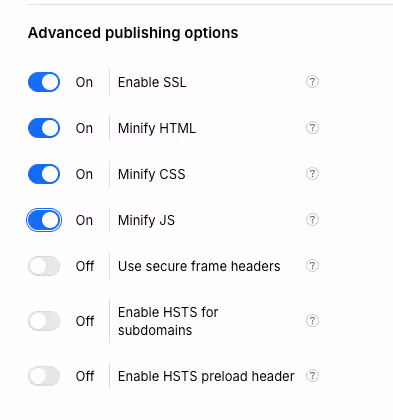
1. Minify CSS, HTML, and JavaScript
- What to do: Enable Webflow’s built-in minification to compress your code, which helps reduce file sizes and improves page load times.
- Best Practices:
- Minify CSS, HTML, and JavaScript to remove unnecessary characters like spaces and comments.
- Regularly audit your site’s performance using Google PageSpeed Insights or Lighthouse.
- Where to do it in Webflow: Head to Project Settings > Hosting, and scroll down to enable minification.
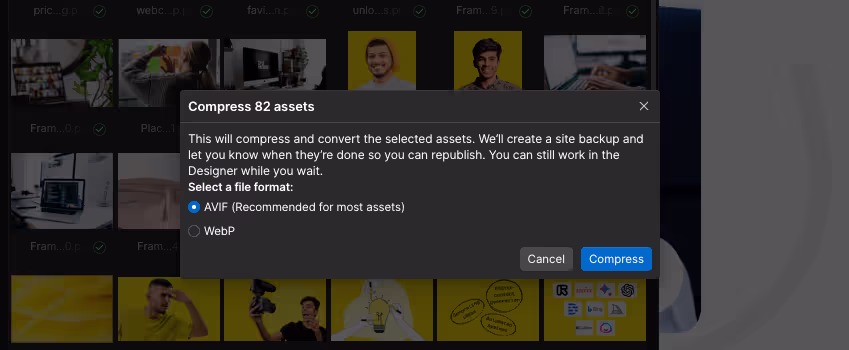
2. Image Optimization
- What to do: Compress all images to reduce file sizes while maintaining quality, and use WebP/AVIF format where possible.
- Best Practices:
- Use tools like TinyPNG or ImageOptim to compress images before uploading them to Webflow.
- Use Webflow’s native WebP/AVIF conversion tool to convert your PNG/JPG images.
- Remember to double-check if these images are optimized to the smallest size without losing quality.
- Keep file sizes under 100KB where possible.
- Where to do it in Webflow: You can directly compress images via the Assets panel.
3. Enable Lazy Loading for Images
- What to do: Use lazy loading to defer the loading of off-screen images, which improves the speed of your pages.
- Best Practices:
- Enable lazy loading for all images that aren’t immediately visible above the fold.
- This ensures that users only load images as they scroll down the page, improving initial page load times.
- Where to do it in Webflow: Go to the Settings panel for each image and toggle on Lazy Load under the image settings.

4. Reduce HTTP Requests
- What to do: Limit the number of external files like images, scripts, and stylesheets to reduce the total number of HTTP requests, speeding up load times.
- Best Practices:
- Combine CSS files and JavaScript scripts where possible.
- Remove unused files, scripts, or plugins that aren’t critical to the functionality of the site.
- Where to do it in Webflow: Clean up unnecessary assets and avoid overloading your site with extra scripts or third-party plugins.
5. Test Site Speed
- What to do: Regularly test your site’s speed using tools like Lighthouse, or GTmetrix.
- Best Practices:
- Aim for a mobile speed score above 90.
- Pay special attention to First Contentful Paint (FCP) and Time to Interactive (TTI) metrics for faster user experience.
- Where to do it: Run tests on external tools like Google Lighthouse and follow the recommendations to improve load times.
Mobile Optimization Checklist
Google prioritizes mobile-friendly sites, and more than 50% of your visitors come from mobile. This is why ensuring your Webflow site is optimized for mobile devices is crucial. So let’s make sure your site performs just as well on mobile as it does on desktop.
1. Responsive Design
- What to do: Ensure your Webflow site is fully responsive, meaning it adapts to different screen sizes and provides a seamless user experience across all devices.
- Best Practices:
- Test layouts on mobile, tablet, and desktop views using Webflow’s built-in responsive design tools.
- Avoid using fixed-width elements that can cause layout issues on smaller screens.
- Make sure that text remains legible and clickable elements like buttons are easy to tap on mobile devices.
2. Optimize Tap Targets
- What to do: Make sure that buttons, links, and other interactive elements are large enough to be tapped easily on mobile devices.
- Best Practices:
- Ensure tap targets (e.g., buttons, links) are at least 48x48 pixels.
- Provide adequate spacing between tap targets to prevent accidental taps.
3. Test Mobile Page Speed
- What to do: Mobile page speed is a ranking factor for Google, so it’s important to ensure your mobile site loads quickly.
- Best Practices:
- Use Google Lighthouse to test your mobile load times.
- Focus on optimizing elements like image compression, lazy loading, and minimizing code to reduce load times.
- Ensure the mobile version of your site doesn’t have large, uncompressed files that can slow it down.
Accessibility Checklist
Optimizing your Webflow site for accessibility not only makes it easier for all users to navigate your content but also improves SEO. Google values accessibility and an accessible site provides a better user experience for everyone.
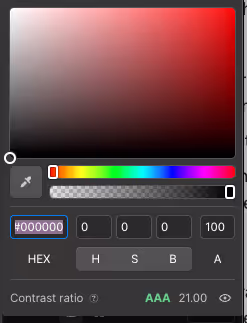
1. Color Contrast
- What to do: Ensure your text has enough contrast against its background to make it readable for all users, including those with visual impairments.
- Best Practices:
- Use Webflow’s built-in contrast checker to ensure your text meets WCAG standards (4.5:1 ratio for normal text and 3:1 for large text).
- Avoid using light text on light backgrounds and dark text on dark backgrounds.
- Where to do it in Webflow: In the Designer, select text elements and check contrast levels using Webflow’s contrast checker.
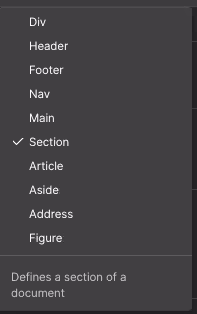
2. Semantic HTML
- What to do: Ensure that all interactive elements (e.g., buttons, forms) use the correct HTML tags to help screen readers understand your site’s structure.
- Best Practices:
- Use semantic tags like
<header>,<nav>,<article>, and<footer>instead of relying on<div>and<span>for structure. - Use
<button>elements for clickable buttons instead of<div>or<span>to ensure they’re recognized by screen readers.
- Use semantic tags like
- Where to do it in Webflow: In the Designer, use the appropriate element types when adding forms, buttons, and other interactive elements.
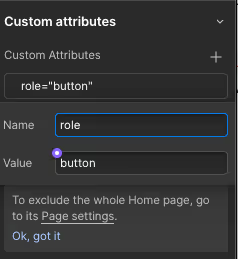
3. Add ARIA Labels
- What to do: Use ARIA (Accessible Rich Internet Applications) labels to describe the functionality of interactive elements for users relying on screen readers.
- Best Practices:
- Add ARIA labels to forms, buttons, and other interactive elements to provide context on their purpose (e.g., “Submit Form” for a button).
- Use ARIA attributes like
aria-label,aria-hidden, orroleto ensure all users understand how to interact with the elements.
- Where to do it in Webflow: Add ARIA labels through Settings > Custom Attributes for each interactive element.
Common Troubleshooting Tips
Even after optimizing your Webflow site, a few issues may still pop up. This section highlights common problems and how to resolve them to keep your site running smoothly and ranking well.
1. Fixing Crawl Errors
- What to do: Crawl errors occur when search engines have trouble accessing certain pages on your site, like a "404 Not Found" or "Access Denied" error.
- How to fix it:
- Use Google Search Console to check for crawl errors under the Coverage section.
- If a page is showing a 404 error, either restore the page or set up a 301 redirect to a relevant page.
- For access issues, ensure that the page is not accidentally blocked in robots.txt or password-protected.
- Where to do it: Monitor and fix crawl errors directly in Google Search Console.
2. Resolving Duplicate Content
- What to do: Duplicate content confuses search engines and can hurt your rankings, especially if multiple versions of a page are indexed.
- How to fix it:
- Add canonical URLs to the main version of each page using the canonical tag
<link rel="canonical" href="URL" />. - Set
noindexon any pages that don’t need to be indexed, like duplicate or staging versions (e.g., your Webflow.io domain).
- Add canonical URLs to the main version of each page using the canonical tag
- Where to do it: Set canonical tags in Webflow’s Page Settings and manage index settings through robots.txt or the SEO settings panel.
3. Handling Broken Links
- What to do: Broken links (links pointing to non-existent pages) can harm your SEO and frustrate users.
- How to fix it:
- Use tools like Screaming Frog or Google Search Console to identify broken links.
- Set up 301 redirects for any removed or moved pages to ensure users and search engines are directed to the right place.
- Where to do it in Webflow: Manage 301 redirects under Project Settings > Hosting > 301 Redirects.
Conclusion
That’s it! By following this Webflow SEO checklist, you’ll ensure your site is fully optimized for search engines and ready to perform well from day one. Whether it’s tweaking your meta descriptions, ensuring your images are compressed, or setting up 301 redirects, these steps will give your site the best chance to rank higher and bring in more traffic.
And remember, SEO is an ongoing process. Even after you’ve launched, it’s essential to keep monitoring your site’s performance and making updates as needed. Be sure to revisit this checklist anytime you launch a new page or make significant changes to your site.
Don’t forget to grab the Google Sheet version of this checklist—it’s a handy tool you can use for future projects to ensure every site you work on is SEO-ready.
Good luck, and happy optimizing!
FAQs
2. How can I check for broken links on my Webflow site?
Use tools like Screaming Frog or Google Search Console to scan your site for broken links. Once you've identified any broken links, head over to Webflow’s 301 Redirects section (under Project Settings > Hosting) to set up redirects and avoid those pesky 404 errors.
3. Does Webflow automatically generate a sitemap?
Yes, Webflow automatically generates a sitemap for your site. You can enable this in the Project Settings > SEO section. Once enabled, submit the sitemap to Google Search Console to help search engines crawl your site more efficiently.
4. How do I optimize images for SEO in Webflow?
Before uploading images to Webflow, compress them using tools like TinyPNG or ImageOptim to reduce file size without losing quality. Don’t forget to add descriptive alt text for each image in Webflow’s Settings panel. This helps search engines understand your images and improves accessibility.


.svg)


.avif)


.avif)


.svg)


.avif)

.avif)
.avif)
.avif)


